SPFS user guide
A SPFS Service Bureau allows participants connected to the SPFS to interact in the Bank of Russia SPFS format.
The SPFS Service Bureau provides the user with an interface to work with various types of SPFS messages as well as an administrative panel where the organisation, SPFS account, user, signing model, authorisation, etc. are initially created and configured.
Acronyms used
SPFS - the Financial Messaging System;
MPC (SPFS)- Message Processing Center (SPFS);
Types of SPFS documents
In the SPFS, different types of documents are exchanged between participants; these documents are also commonly referred to as envelopes. The ED503 and ED501 envelopes are the most commonly used for messaging.
Below we will take a closer look at the types of messages supported by the Service Bureau:
-
ED512 - instruction for managing SPFS user details. This is a service message that needs to be generated and sent to the SPFS MPC in advance in order to be able to accept certain types of messages from a particular counterparty.
-
ED573 - request for a directory of users of the Bank of Russia financial messaging system.
-
ED501 - message of participants' own formats, sometimes referred to as a free format. All types of files can be transferred with this type of message. SPFS participants transmit messages with file types that are agreed upon in advance, e.g. text messages.
-
ED503 is a financial messaging envelope (SWIFT). Messages transmitted by such an envelope are subject to additional formatting and logical control in the SPFS, following the same rules that apply to SWIFT messages.
-
ED506 - envelope for transmitting financial messages in ISO format
-
ED514 - envelope for transmitting financial messages in the SWIFT MX format.
Administrator settings panel
Before you can start working in the SPFS section, you need to enter a number of settings in the administrator settings panel.
To go to the administrator settings panel, click on the user name in the top right corner and select Settings:

|
|---|
| Go to Settings |
Setting up an organisation
The first thing to do is to add an organisation in the Organisations section using the Add button. The following fields must be filled out in the form for adding an organisation:
-
Full name- text field; -
Short name- text field; -
English name- text field;Note: To avoid confusion in the test segment, the name of the organisation should be marked to indicate that it is the organisation under test;
-
Group- optional field, can be left blank for SPFS; -
INN/KIO- in the case of residents of the Russian Federation, you must fill in the field with your TIN data; for non-residents, you must enter an arbitrary value, e.g. “1234567890”; -
KPP- optional field, can be left blank for SPSS; -
OGRN- residents of the Russian Federation must indicate their Primary State Registration Number (OGRN); non-residents must indicate an arbitrary value, e.g. “1234567890123”; -
OKPO- residents of the Russian Federation must indicate their Russian National Classifier of Businesses and Organisations (OKPO); non-residents must indicate an arbitrary value, e.g. “1234567890123”;Note: TIN, OGRN, OKPO are used for Russian organisations. These codes do not play a business role in the SPFS, so, as indicated above, arbitrary values may be set in these fields for non-residents;
-
Integration Gateway channel codeandNSD person code– identifiers in NSD’s EDI system. These codes are issued together with the agreement or issued by technical support at the testing phase. Integration Gateway channel code is the same as NSD person code.Please note: the codes in the test and production segments are different.
-
SPFS user code– the 11-digit user code assigned by the SPFS (same as SWIFT BIC). If the client does not have a SWIFT BIC, the SPFS assigns its own value; -
Sberbank ID (KPP)- not to be completed for the SPFS; -
Raiffeisenbank ID (Hash)- not to be completed for the SPFS; -
The
Branchoption is not used for SPFS, leave it off;
Once the form has been completed, click on the Save button.
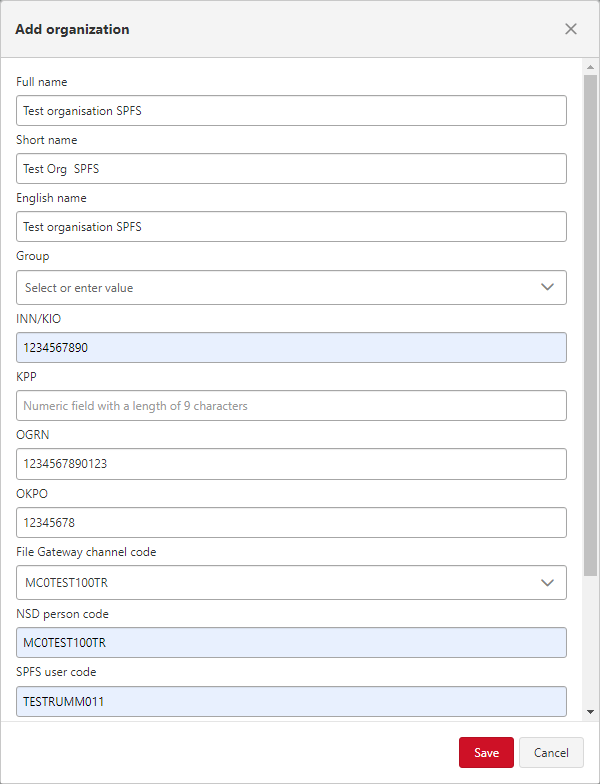
|
|---|
| Adding an SPFS organisation |
Adding an SPFS account
Before creating an SPFS account, make sure that the directory of SPFS participants (ED574) has been received.
You can check if this directory has been downloaded in the folder:
C:\Program Files (x86)\NSD Tranzit\config\Dict or ...\config\dict
In production, the user directory is sent automatically at the beginning of every 24 hours, Moscow time. In a testing environment, you can request the directory by sending a request to technical support at transit-help@nsd.ru.
Please note The directories differ in the test and production segments. This is one reason why a test segment should not be subsequently converted into a production segment. It would be more correct to deploy the production run on a separate server.
To add an SPFS account, go to Accounts and click on the Add account button, a form will open which should be completed as follows:
- tick
Without number; - select the SPFS value in the
Modulefield, then theUse SPFSoption will be automatically enabled; this option is locked for changing; - in the
Organisationfield, select the organisation previously configured; - select one of the two values (Sequential or Hierarchical) in the
Sign model typefield. For details on the differences between the two types of models, refer to the Signature model types section; - if necessary, enable the checkbox
SPFS participants list (ED574(3))to use the directory with counterparties to whom the sender can send messages (the directory is sent in response to the ED573 request with the directory code 3). This will allow you to import messages with counterparties that are not in the general list, as well as select them in the on-screen message creation form without manual input.
After the selection, the checkboxRequest participants list automaticallybecomes available — when enabled, a request message for counterparties will be automatically created (ED573(3)). The message will be created with the frequency specified in thePeriod and intervalfield in CRON format.
Please note: counterparty request messages will be sent automatically only if the signing model is not configured for them, otherwise each message must be sent manually.
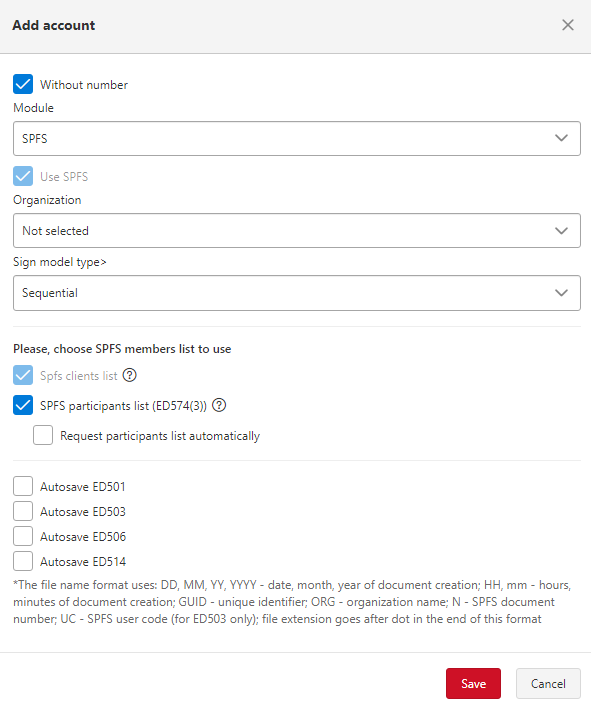
|
|---|
| Adding an SPFS account |
There are also two options on the form:
Autosave ED501- if the option is enabled, ED501 incoming documents will be saved automatically to a specified directory. See section Automatic saving of incoming messages for more details;Autosave ED503- if the option is enabled, ED503 incoming documents will be saved automatically to a specified directory. See section Automatic saving of incoming messages for more details;Autosave ED504- if the option is enabled, ED504 incoming documents will be saved automatically to a specified directory. See section Automatic saving of incoming messages for more details;Autosave ED516- if the option is enabled, ED516 incoming documents will be saved automatically to a specified directory. See section Automatic saving of incoming messages for more details;
Once the form for adding the account has been completed, click on the Save button.
Setting up the signature model
After setting up the account, proceed to setting up the signature model for this account and the corresponding document types.
A signature model describes the flow of a particular document type on an account until it is sent to the SPFS MPC. Signature models are configured in terms of document types and accounts, and describe the envisaged approval phases for the specified account and document type.
To proceed to setting up the signature models, left click on the account under Accounts and an additional line with the Sign models button will be displayed:

|
|---|
| Going to Sign Models section |
By clicking on the Sign models button, the modal window Sign models of

|
|---|
| Sign Models section |
To add a signature model, you need to:
-
press the
Add modelbutton; -
in the modal window, select the document type from the drop-down list for which the current signature model is being set up. Document types are described in detail in the Types of SPFS documents section;
-
if the document does not require approval and immediately after creation should be sent to SPFS MPC without verification, the
Signing phases are not requiredoption is activated, otherwise point 4 is executed; -
The approval phases for the document are set, click on the
Addbutton and select phase type in the new field. The typeAgreementcan be specified as the signature phase for SPFS documents. By ticking the stageAgreement, you require approval of the document by the user, for whom the appropriate authority will subsequently be made available, as detailed in the section Configuring User Authority. -
Restrictions in the SPFS are not used, the block should be left blank.
-
Click on the
Savebutton at the bottom of the modal window;
Note: only the approval phase is used in the SPFS. Electronic signature is not used.
Note:
- We recommend using no more than two Approval phases.
- Only one signature model is created for a document within one account (SPFS). If a signature model for a document type has already been created, this document type will not appear in the drop-down list when a new model is created.
- One user cannot approve the same document more than once, regardless of the settings. Thus, if two approval phases are configured in the signature model, it is assumed that one user will approve the document in the first phase and another user in the second phase.
To edit the signature model, you should:
- left-click on the line with the type of document whose signing model is to be changed;
- set or delete the signature phase in the modal window (the field with the document type is not available for editing);
- click on the
Savebutton at the bottom of the modal window.
After editing the account signature model, the assigned signature phases on a given account with a user can be reset.
To delete the signature model, you need to:
- tick the checkbox of the signature model to be deleted;
- press the
Deletebutton; - confirm deletion.

|
|---|
| Deleting a signature model |
Setting up users
Once Terminal Transit is installed, a user with username admin and password 1234 is registered in the system.
The user password can be changed, see section Changing user password for details.
The Users section of the admin settings panel configures the users of the Transit Terminal.
The section is for adding, deleting and editing users as well as configuring authority.

|
|---|
| Section Users |
To add a user, click on the Add button and a modal window will open. The following fields are available on the form (mandatory fields are marked with *):
User's display name*- the user name that will appear in the interface;Login to log in*- the username to be entered at authorisation;Password*- the password to be entered at authorisation;Repeat the password*- duplicate password;The number of the login certificate- leave empty for SPFS;Comment- additional information is indicated;- Option
Domain userenables login authorisation with domain account. Note: The option is only displayed on the form if the relevant setting is enabled in the Transit Terminal configuration file (the Web.UseDomainAuth key is set to true);
Attention: at least one of the following options must be enabled:
- Option
Allow access to WEB interface- if enabled, the user will be granted access to the Transit Terminal interface. If disabled, then login to the application will be blocked for such a user; - Option
Allow access to integration API- if enabled, the user will be granted access to the integration API, therefore, he will be able to use all available API methods; - Options with created roles - each role has permissions and restrictions for working with the administration panel, the first four roles are basic roles created in the system.
Delegation of roles- consists of the following fields: -Select the user to whom you want to delegate roles- select the user to whom your roles will be copied. -Period start date- specify the date when your roles will be copied to the user. The roles will be copied at 00:00 of the selected day. -Period end date- specify the date on which your roles will be deleted from the user. The roles will be deleted at 23:59 of the selected day. -Block current user- select if you want to block the current user for the delegation period. The user will be prohibited from logging in and executing API commands.
Once the form has been completed, click on the Add user button. The new user will appear in the table section.
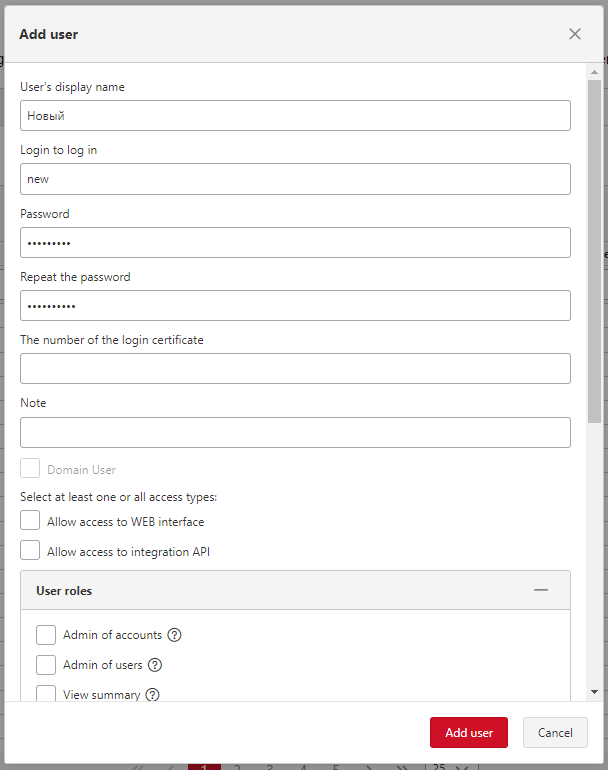
|
|---|
| Creating a user |
To edit user data, you need to:
- left-click on the user and an additional line with a
Change user databutton will be displayed, which will open an edit form when clicked. You can also open the edit form by double-clicking on the user you are looking for; - change the required fields on the form (except for the login as this field is locked for editing);
- Press the
Savebutton.
To remove a user, you need to:
- tick the box of the user or users to be deleted;
- press the button
Delete; - confirm deletion.
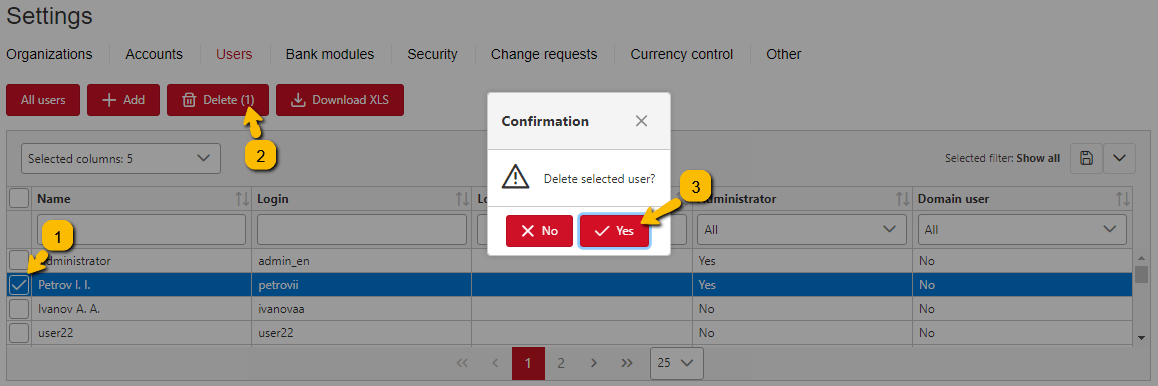
|
|---|
| Deleting a user |
Only one user can also be assigned the role of confirming changes. This role only regulates the approval of changes to Transit Terminal settings, and has nothing to do with the approval of business documents. If a user has been assigned this role, a Change Request section will be available in the Settings Panel where the user can approve or reject change requests. For more information, see the sections Setting confirming role to user and Change requests.
Left-clicking on a user opens a row with the buttons Change user data, Certificates, Accounts and Permissions and Copy user permissions:
- The
Change user databutton opens an edit form to make changes to the user’s details;
- The
Accounts and permissionsbutton opens a modal windowManage user permissionswhere the user’s authority is configured. For details, see Configuring User Authority section. - For details on button
Copy user permissionsfunctionality, see section Copy user permissions.

|
|---|
| User - a row with the buttons |
Configuring User Authority
User permissions are set in terms of accounts and document types. The permissions define what actions a user can perform with a specific document type within a specific account (import, view, delete, etc.), as well as establish the user’s right to approve a document at a specific phase.
Once users have been added to the system, it is necessary to determine which permissions will be available to each of them. It is possible for one user to import, review and delete documents and for another user to review, approve and reject documents, but not to be able to import documents. This was just one possible example. In reality, authority settings are very flexible, making it possible to implement almost any document handling scenario at the user authority level.
To go to user authorisation settings, you need to left-click on the relevant user and then click on the button Accounts and permissions:

|
|---|
| Accounts and permissions |
Next, in order to add permissions to the user, double-click on the account field, after which the User permissions management tab will open, then perform the following actions:
-
choose an account;
-
select the necessary type of document.
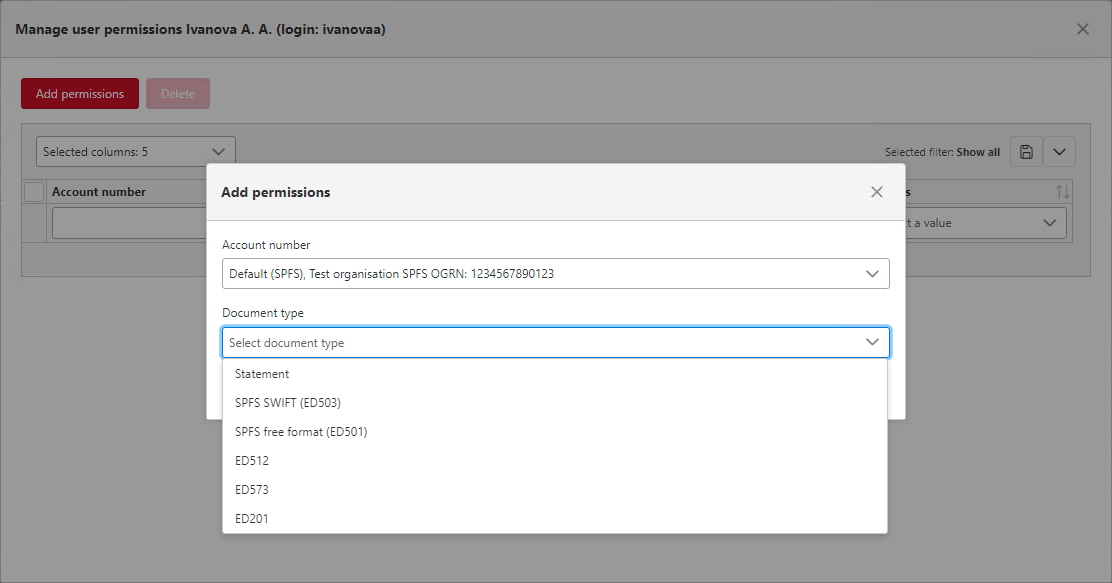
Selecting a document type -
set permissions - tick the appropriate options.
- The following permissions are available for the SPFS document types:
Viewestablishes the user rights to view the specified document type for the SPFS account;Importestablishes the user rights to import the specified document type for the SPFS account;Deleteestablishes the user rights to delete the specified document type for the SPFS account. See section Deleting SPFS Documents;Cancelestablishes the user rights to reject the specified document type for the SPFS account. See section Rejecting SPFS Documents;
- only one authority is available for Statement and ED201 document types:
Viewestablishes the user rights to view the specified document type for the SPFS account;
- The following permissions are available for the SPFS document types:
-
If Approval Model is configured for the document being searched, the Document Signing Phases block will appear. To set the user’s signing or approval rights, click on the
Add signing phasebutton, which will open a modal window Add signing phase, where the following fields may be present:Phasewhich is always displayed on the form. This field selects the phase for which the user approves the document. Values in the drop-down list are displayed in accordance with the signature model settings entered for the account in question (for details, see section Setting up the signature model);
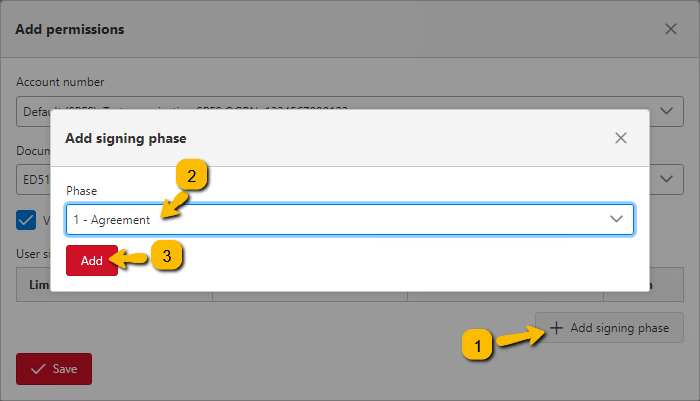
Adding an approval phase -
Click
Addin the Add signing phase window; -
click the
Savebutton in the Add permissions window.
The illustration below shows an example of how to configure user permissions for one of the SPFS document types. With this setting, the user will be able to view ED512 documents in the tabular part, approve them before sending them to the SPFS MPC, reject them if necessary, but will not be able to create ED512 documents.

|
|---|
| Adding authority to a user |
To edit a user’s permission, you need to:
- click on the row with the account and document type in the table, a modal window will open;
- in the modal window edit necessary data;
- click on the
Savebutton.
To delete a user’s permission, you need to:
- tick the position to be deleted;
- press the button
Delete; - confirm deletion.
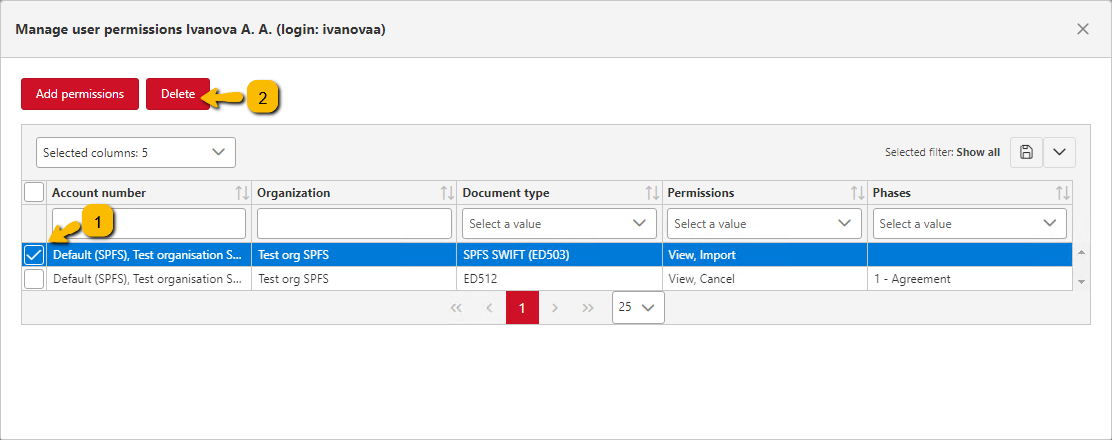
|
|---|
| Deleting a user’s authority |
If you need to assign the same authority to a large number of users, the Transit Terminal provides a user authorisation copying function, which is explained in detail in the section Copy user permissions.
Important note: The administrator’s (user with option Administrator ) work with documents is governed by the permissions configured just like for normal users. If the administrator has not configured permissions for the SPFS account and document type, he/she will not be able to perform any actions with this document type (import, create, view, sign, etc.) in the SPFS user interface.
Other
When working with SPFS in the Other section of the administration panel, you must set the operational day.
The operational day in the production segment is the same as the current date.
Please note: In the test segment, as a rule, the operational day does not coincide with the current date.
The operational day for the test segment is set according to the information available on the Bank of Russia website at https://cbr.ru/development/mcirabis/regl/
The website specifies the testing date, which is to be indicated in the settings as the operational day for the test segment.
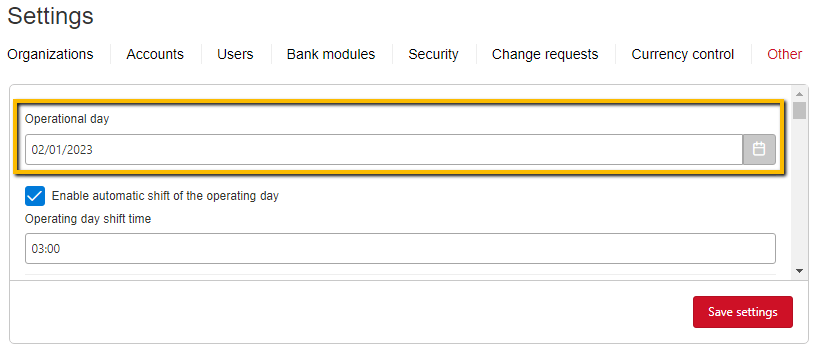
|
|---|
| Setting the operational day |
Subsequently, the date specified in the operational day will be in the EDDate field of the generated ED envelope of the SPFS documents. The picture below shows a generated ED envelope of document ED512 where the EDDate field is populated according to the business date specified in the settings of the Other section:
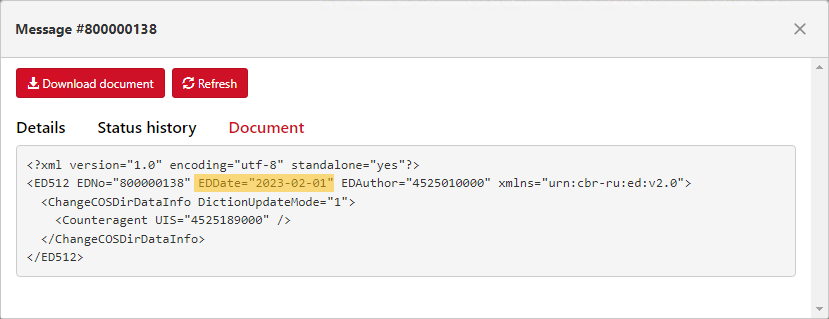
|
|---|
| Filling in the EDDate field in the ED envelope |
It is also possible to set up automatic changeover of the operational day by enabling the corresponding option and specifying the time of the operational day changeover in HH:MM format (hours, minutes).
This section also includes useful settings such as auto-import of documents and document archiving that can be applied when working with SPFS.
You can set up automatic import of SFPS documents into the Transit Terminal from a specific directory at a specific interval.
To set up automatic import for SPFS documents, you need to enable the Automatic import option, then the SPFS option and specify the mask (the characters in the name of the imported files by which the SPFS document will be identified). Next you need to select the method of marking the imported documents, the period of checking folders and the path to the automatic import folder. Detailed description of automatic import settings for documents and possible scenarios are given in section Automatic import of documents.
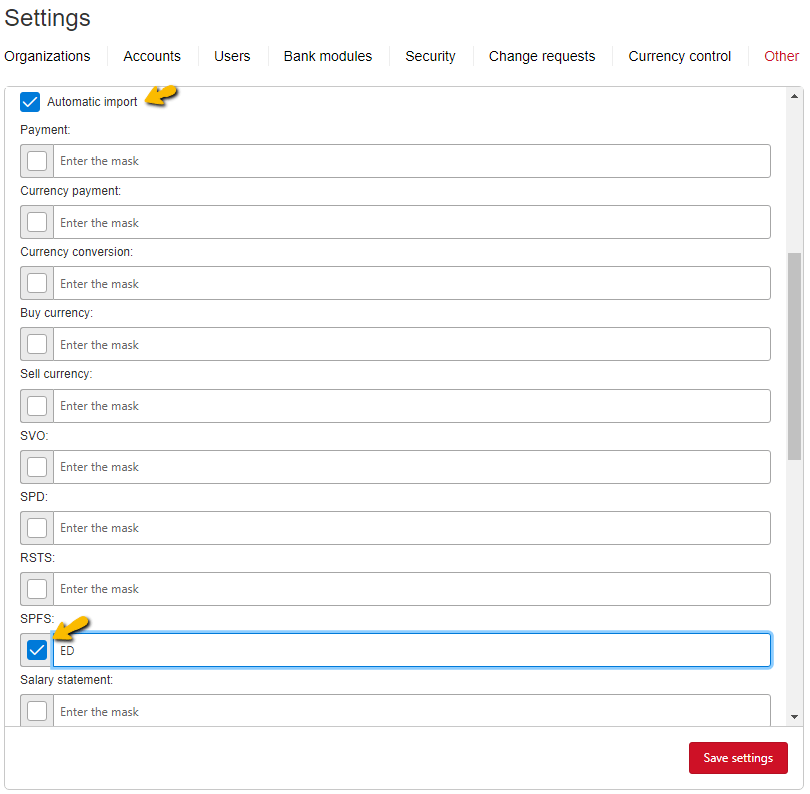
|
|---|
| Setting up automatic import for SPFS documents |
Please note that automatic import for SPFS documents is only possible for SWIFT messages (ED503).
The process of deleting documents from the Transit Terminal with pre-archiving is described in detail in section Deleting documents (pre-archiving).
SPFS - user menu
Once all necessary settings have been made in the admin settings panel, you can proceed directly to working with SPFS documents. SPFS documents are handled in the user menu, in the SPFS section.
An English version of the SPFS section is also available. To switch to English, you need to select English in the top bar:

|
|---|
| Switching to English |
Tabular part
The tabular part provides information about the SPFS documents. Outgoing messages ED512 and ED573 as well as messages ED501 and ED503 both outgoing and incoming are accumulated here.
The current user can view the documents provided that the user settings for the SPFS account and the document type being searched enables authority View.
When the viewing rights for documents ED501 and ED503 are enabled, both incoming and outgoing messages will be displayed in the tabular section.
The following columns are provided in the tabular part:
SPFS number- the SPFS document number is displayed. The value can be entered manually in the filter field;Direction- the direction of document is displayed, either incoming or outgoing. The value in the filter field is selected from a drop-down list;Date- the date and time of creation is displayed for outgoing documents; and only the date of message without time indication for incoming documents. The value in the filter field is selected from the calendar;Sender- the sender of the message is displayed;Receiver- the recipient of the message is displayed;SWIFT number- SWIFT number in the SPFS system, to be filled in for ED503 only. The value can be entered manually in the filter field;SWIFT sender- sender’s SWIFT BIC for message ED503, not to be completed for other message types. The value can be entered manually in the filter field;SWIFT receiver- receiver’s SWIFT BIC for message ED503, not to be completed for other message types. The value can be entered manually in the filter field;SWIFT message type- type of SWIFT MT message (ED503). The field is only relevant for ED503. The value can be entered manually in the filter field;Document type- the type of the message is displayed: SPFS SWIFT (ED503), SPFS free format (ED501), ED512, ED573. The value in the filter field is selected from a drop-down list;Status- the current status of the document is displayed. The value in the filter field is set by ticks, a text search option is provided;Sum- the field is relevant for ED503 with types MT 103, 195 and 202 (the amount is filled based on the 32A field in SWIFT message);Currency- the field is relevant for ED503 with types MT 103, 195 and 202 (the currency is filled based on 32A in SWIFT message);Is read- a message is automatically marked as read if it has been opened or the message attachment has been downloaded.
To manually change the status, theMark as readbutton is located in the header of the section. It becomes active when selecting one or more unread messages in the table, or when selecting messages in both statuses. The button changes toMark unreadwhen selecting only viewed messages in the table.Author- the document author. Populated automatically with the user’s login when creating, importing, or copying a document. The field remains empty during automatic imports;Phases- all message phases (approval phases) are displayed, the stages that have been completed are marked with a tick;
The illustration below shows the tabular part in the “SPFS” section:

|
|---|
| SPFS - the tabular part |
The Transit Terminal provides the ability to set filters in any of the columns, and to sort the data in the table by any of the columns. For example, in the picture below, the tabular part is filtered by outgoing messages with document type ED503. In this table, the data is sorted by SWIFT message type (left-click on the arrows to the right of the column header to sort). The column by which the data is sorted in the table is highlighted in blue.

|
|---|
| Sorting and filtering |
It is also possible to customise the display of columns in the tabular part. If you uncheck certain columns, they will not be displayed in the tabular part:

|
|---|
| Setting the columns to be displayed |
The section Saving table display settings explains in detail how you can save the table settings you have entered (filters, sorting, column display).
On the right side above the table, the total amount of the ticked documents is displayed (you can pre-filter the table part by document type ED503 and other required parameters):

|
|---|
| Total amount of selected documents |
If documents with different currencies are highlighted, the total amount is not displayed:

|
|---|
| Total amount of selected documents (different currencies) |
ED512
ED512 is an instruction to a counterparty that allows or prohibits the exchange of various types of messages, for example, ED501 or ED503. The order is sent to the MPC on behalf of the SPFS user. The sent order is valid indefinitely.
To be able to receive your messages, the counterparty must also allow the exchange by sending message ED512 to the MPC.
As a response to message ED512, the MPC sends message ED574, which contains only changed information of the SPFS user, from whom the message ED512 was received and processed.
Creating ED512
Creating ED512 is available to users who have the right to import a document as set in the authority settings. For the user who has the right to import a document, it is advisable to set the right to view it.
The ED501 must also be preconfigured with a signature model.
In order to generate and send an ED512 message through the Transit Terminal interface, press the Create ED512 button.
A form will open where you need to:
-
select an organisation from the drop-down list in the
Senderfield; -
in the
Document typefield, select a type of envelope:- SPFS SWIFT (ED503);
- SPFS Free format (ED501);
- ED506;
- ED514.
ED512- selecting a document type -
select an action in the drop-down list
Permission for exchange:- Allow exchange — allow the exchange of specified messages with the counterparty.
- Revoke exchange permission — revoke the permission to exchange the specified messages with the counterparty.
-
The field
MT messages allowed for exchangeis only displayed on the form if SWIFT document type (ED503) has been selected. Here, according to the mask, the types of MT messages that are allowed to be sent to the counterparty are listed. If the counterparty is given permission to send any type of MT message, the field is not completed.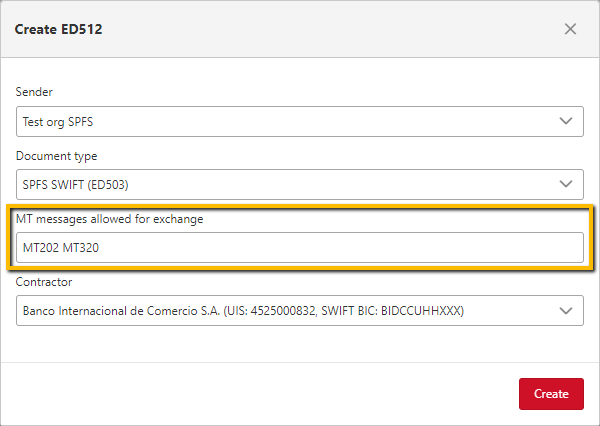
List of MT message types that are allowed to be exchanged -
the checkbox
Manual input— check to enter counterparty requisites manually. When checked, theContractorfield is hidden and the next fields become available:Receiver UID*— enter the receiver UID.Receiver SWIFT BIC*— enter the receiver SWIFT BIC.
-
in the field
Contractor, select the SPFS participant from the drop-down list with whom you plan to exchange with the specified envelope type (it is the counterparty you give permission to send you documents with the specified envelope, in the case of ED503, the MT message types for exchange can be also set, as described above). The list of counterparties is formed according to the directory of SPFS participants, which is updated daily (in the production segment). A text search by name, UIS and SWIFT BIC has been implemented for a convenient counterparty search. The field is available only after selecting the sender. -
click on the
Createbutton.
Please note You need to send an ED512 message to the MPC for each of the counterparties with which you intend to exchange documents of a certain type (ED503 and ED501). If both ED503 and ED501 are to be exchanged with a counterparty, two ED512 messages need to be created and sent to that counterparty, one to authorise the counterparty to send you messages with an ED503 envelope (list the types of MT messages if applicable) and one to authorise the counterparty to send you messages with an ED501 envelope.
To receive any messages from you the counterparty should also send an ED512 to the MPC, thereby giving you permission to send them messages with a specific envelope.
Sending ED512
Depending on the signature model configured, the ED512 can be sent to the MPC:
- immediately after the document has been created and saved (via the
Createbutton) in case theSigning phases are not requiredoption is activated in the signature model settings for the ED512 document; - after the document has been approved at all stages specified in the signature model. This is usually one or two approval stages.
If the Signing phases are not required option is activated in the Signature Model settings for an ED512 document (see section Setting up the signature model), the document is sent to the MPC immediately after it has been created.
If the approval phase/phases has/have been configured in the Signature Model settings, the document must be approved by an authorised user before the document can be sent to the MPC.
** Please note:** after sending ED512 specifying a counterparty that is not in the common directory and receiving the response ED574(512), the outgoing document ED573(3) is automatically generated. If the signing model is not configured for ED573(3), it is immediately sent to the MPC.
To approve the document, you need to tick it in either the first column or tick the checkbox in the Phases column and click on the Agreement / Sign button (or Agreement and send / Sign and send). The name of the button is dynamic depending on whether the current phase has a signature or approval type. If the type is Sign, the button will be named Sign and send or Sign (in case several signatures are set up and the signature to be given is not the final signature). Similarly, if approval has set up, the button is called Agreement and send or Agreement (in case more than one approval phases are set up and the current approval is not final).
The illustration below shows approval of a ED512 document with one phase. In this example, for convenience, the tabular part has been pre-filtered by document type and Draft status, then in the phases column the first phase has been ticked and the Agreement and send button pressed. As a result, all marked ED512 documents will be agreed and sent to the MPC.

|
|---|
| Approval of ED512 |
Note that for a user who has approval authority over a document in the current phase, these documents will be highlighted in green in the tabular part. Thus, the green colour for the user is an indicator that these documents need to be approved.
The approval process is the same for all types of documents. A detailed example on signing documents can be found in the section Signing SPFS documents.
Once the ED512 message has been created and approved, it is sent to the MPC. The ED512 message can be considered to have been processed by the MPC as soon as the ED512 document has been assigned the status Done. You will in turn receive an envelope ED574, the printed form of which can be viewed by opening the ED512 document detail. You will then be able to receive documents from the counterparty with the envelope type specified in ED512 (ED501 or ED503).
ED512 statuses
If the ED512 document is sent successfully, it passes the following statuses:
- Draft - the document is in this status as soon as it is created;
- In the signing queue - the document moves to this status when it is being approved. This status is not relevant for documents with the signature model not providing approval phases. In this case, after the document is created, from the Draft status it is immediately moved to the In the queue for sending status;
- In the queue for sending - the document is in the queue to be sent to NSD;
- Sending to NSD - this status is assigned after the document has been posted in the Integration Gateway folder, but before a reply receipt is received;
- Sent to NSD - this status is assigned after uploading the message to the Integration Gateway folder with confirmation of sending;
- Sent to service-bureau - this status is assigned after the document has been sent to the SPFS Service Bureau;
- Delivered to service-bureau - this status is assigned after the document has been delivered to the SPFS Service Bureau;
- Done - it is assigned after the document has been processed in the SPFS Service Bureau and ED574 has been received in response. This is the final status;
The statuses assigned in case of any errors are described in a section Error statuses.
ED512 - detail
Double left-clicking on ED512 opens a form detailing the document. The name of the modal window contains SPFS message number.
The following buttons are available on the form:
Download Document- the button allows you to download a document converted to SPFS format after the document has been agreed/signed or sent. If the document is in Draft status (i.e. no ED envelope has been generated), it is not possible to download such a document, an error occurs when trying to download the document;Download ED574(PDF)- is only displayed for documents in Done status, otherwise the button is not available on the form. By clicking on the button you can download the Information on SPFS participants received in response to ED512 in PDF format (contains only the amended Directory information for the SPFS user from whom the ED512 message was received and processed).Refresh- the form is updated according to the latest data on the document;
The following tabs are available on the form:
-
Details- the document parameters and their values are displayed; -
Status history- changes in the document statuses can be traced; -
Linked documentsis only displayed for documents with the status Done. This tab in the tabular section displays the documents associated with the current ED512 .
ED512 - linked documents -
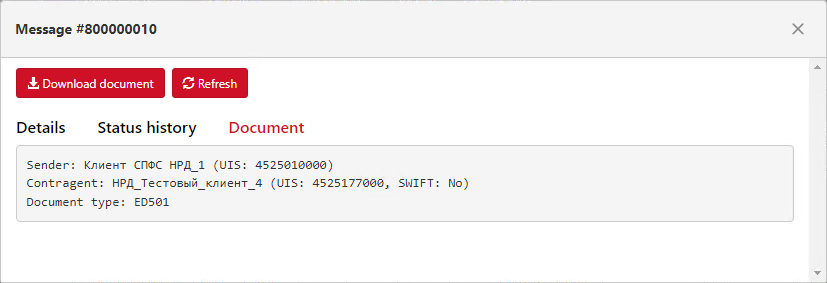
Document- in case the document is in Draft status, the original information of the document (Sender, Countragent and Document Type) will be displayed as shown in the figure below:
Displaying Document ED512 in Draft status In case of document type ED503, information on allowed MT message types will also be displayed if they were listed in the corresponding field in the ED512 creation step.

Display ED512 document with type ED503 in Draft status Otherwise, if the document has been approved or sent immediately, the
Documenttab will display the generated ED envelope as shown in the figure below.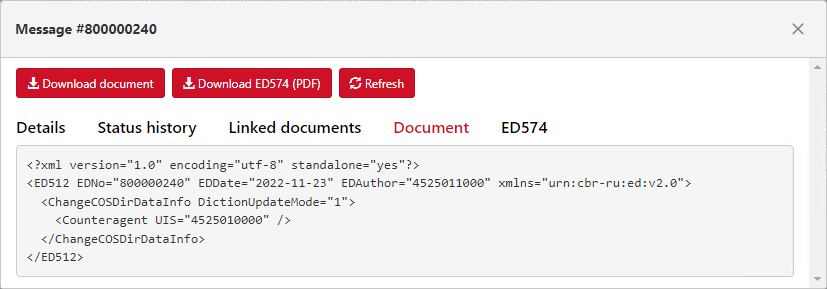
Displaying the ED envelope for ED512 -
ED574is only displayed for documents with Done status. The tab contains the ED574 (Information on SPFS Participants) report received in response to ED512 (contains only the amended Directory information for the SPFS user from whom the ED512 message was received and processed). The same form can be downloaded by clicking onDownload ED574 (PDF).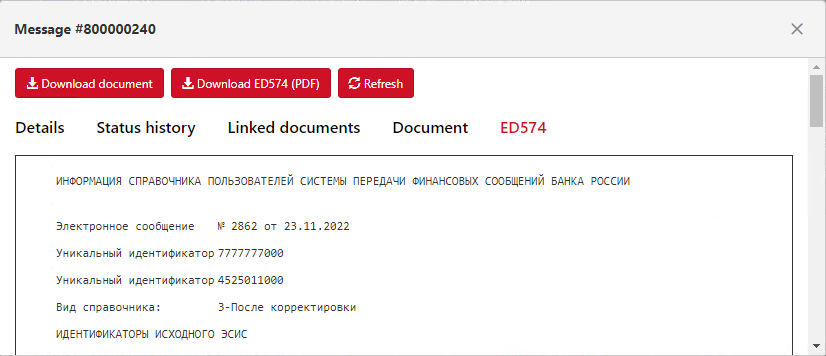
Print form ED574 for executed ED512
ED573
Message ED573 is used to request a directory of users of the Bank of Russia Financial Messaging System. The user of the SPFS who initiated the request receives in response ED574, which contains information about all users of the Bank of Russia Financial Messaging System.
Creating ED573 is available to users who have the right to import a document as set in the authority settings. Document ED573 must also be preconfigured with a signature model.
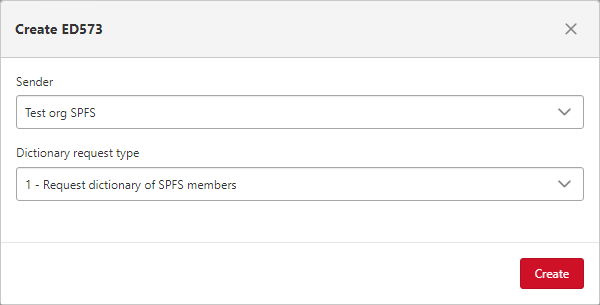
In order to create an ED573 document, click on the Create ED573 button, a modal window will open, where the following actions are required:
- in the field
Sender, select the sender organisation from the list; - in the field
Dictionary request type, select one of three values from the drop-down list:- 1 - Request dictionary of SPFS members;
- 2 - Request dictionary with information about members which can send messages;
- 3 - Request dictionary with information about members which can receive messages;
- click on the
Createbutton.
|
|---|
| Creating ED573 |
Once the document has been created, it should be sent to the MPC. If the No signing phases are needed option is activated in the signature model settings for the ED573 document, the document is sent immediately after it has been created.
If the approval phase/phases are configured in the signature model settings, the document must be approved by an authorised user before it can be sent.
The illustration below shows approval of a ED573 document with one phase. As a result, the agreed document will be sent to the MPC.

|
|---|
| Approval of ED573 |
The approval process is the same for all types of documents. A detailed example on signing documents can be found in the section Signing SPFS documents.
The message ED573 can be considered to have been successfully processed in the MPC as soon as the ED573 document sought is assigned the status Done and an ED574 envelope will be received in response, the printed form of which can be observed by opening the ED573 document detail form.
Double left-clicking on ED573 opens a form detailing the document. The name of the modal window contains SPFS message number.
The composition of the tabs and buttons on the form for document ED573 is the same as for document ED512. Therefore, the description of the tabs and buttons can be found in the example ED512 in section ED512 - detail.
Please note that for executed ED573 (status Done) as well as for ED512, the Download ED574(PDF) button and the ED574 tab will appear on the form where it is possible to view information on all users of the Bank of Russia financial messaging system received in response to the request.
The statuses of an ED573 document when sent successfully are similar to those for an ED512 document, see section ED512 statuses.
ED501
ED501 - message of participants' own formats, sometimes referred to as a free format. All types of files can be transferred with this type of message. SPFS participants transmit messages with file types that are agreed upon in advance, e.g. text messages.
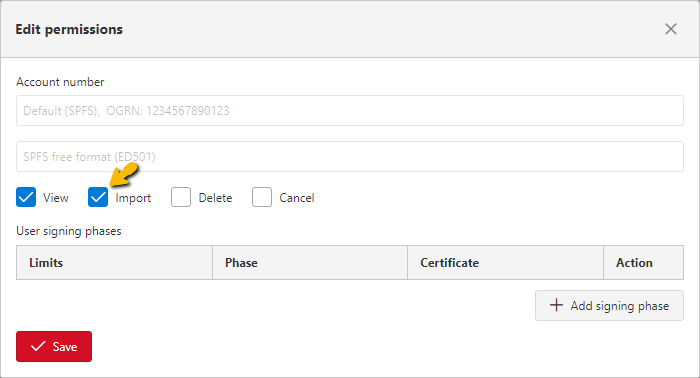
The user of the SPFS sends an ED501 to the MPC. ED501 contains a message with the information established by the bilateral protocol of information interaction between the sending and receiving participants. The SPFS user receives ED508 in response with information on the status of the message. If the control is successful the MPC sends ED501 to the recipient.
Creating ED501 is available to users who have the right to import a document as set in the authority settings. For the user who has the right to import a document, it is advisable to set the right to view it.
|
|---|
| Authority to create ED501 by the user |
Document ED501 must also be preconfigured with a signature model.
In order to create a free format message ED501, click on the button Create ED501, a modal window will open, where the following actions are required:
- in the
Senderfield, select the sender organisation from the list; - in the
Receiverfield, select the SPFS participant from the list of participants, to which the current envelope is to be sent. A text search by name, UIS and SWIFT BIC has been implemented. The field is available only after selecting the sender; - Press the button
Choose a fileto open an explorer window where you must select the message file.

|
|---|
| Creating ED501 |
Once the file is selected from Explorer, the created message ED501 will be displayed in the tabular part:

|
|---|
| ED501 in the tabular part |
If the option Signing phases are not required is activated in the Signature Model settings for an ED501 document (see section Setting up the signature model), the document is sent to the SPFS Service Bureau immediately after it has been created.
If the approval phase/phases has/have been configured in the Signature Model settings, the document must be approved by an authorised user before the document can be sent.
To approve the document, you need to tick it in either the first column or tick the checkbox in the Phases column and click on the Agreement / Sign button (or Agreement and send / Sign and send). The name of the button is dynamic, depending on what type the current phase is (signing or agreeing) and whether the current phase is the final phase. You can pre-filter by any of the parameters, and select the filtered entries in the table at once by checking the box in the table header in the first column or by ticking the appropriate stage in the top row of the column Phases.
The illustration below shows approval of a ED501 document with one phase. As a result, all ED501 documents will be agreed and sent to the end user.

|
|---|
| Approval of ED501 |
Note that for a user who has approval authority over a document in the current phase, these documents will be highlighted in green in the tabular part. Thus, the green colour for the user is an indicator that these documents need to be approved.
The approval process is the same for all types of documents. A detailed example on signing documents can be found in the section Signing SPFS documents.
Once ED501 has been created and approved, it is sent to the final recipient.
The ED501 message can be considered to have been successfully processed by the SPFS MPC and sent on to the recipient once the ED501 is assigned the Sent to the recipient of the SPFS status.
It is also possible to automatically save ED501 incoming documents (see section Automatic saving of incoming messages).
ED501 statuses
If the ED501 document is sent successfully it passes the following statuses:
- Draft - the document is in this status as soon as it is created;
- In the signing queue - the document moves to this status when it is being approved. This status is not relevant for documents with the signature model not providing approval phases. In this case, after the document is created, from the Draft status it is immediately moved to the Queued for sending status;
- In the queue for sending - the document is in the queue to be sent to NSD;
- Sending to NSD - this status is assigned after the document has been posted in the Integration Gateway folder, but before a reply receipt is received;
- Sent to NSD - this status is assigned after uploading the message to the Integration Gateway folder with confirmation of sending;
- Sent to service-bureau - this status is assigned after the document has been sent to the SPFS Service Bureau;
- Delivered to service-bureau - this status is assigned after the document has been delivered to the SPFS Service Bureau;
- Sent to the recipient of the SPFS - assigned when ED508 (with status information of the electronic message) is received from the SPFS MPC (successful processing of the message in the MPC). This is the final status;
Important note: The ED508 received from the SPFS MPC will not be shown in the interface; in this case the document will be assigned the status Sent to the recipient of the SPFS, which will indicate that ED508 has been received.
The statuses assigned in case of any errors are described in a section Error statuses.
ED501 - detail
Double left-clicking on ED501 opens a form detailing the document. The name of the modal window contains SPFS message number.
The following buttons are available on the form:
Download document- allows you to download a document converted to SPFS format after the document has been approved or sent to the MPC. If the document is in Draft status, the attachment (the file selected when the document was created) is downloaded;Download attachment- the button downloads the attachment (decoded file of message ED501);Refresh- the form is updated according to the latest data on the document;
The following tabs are available on the form:
-
Details- the document parameters and their values are displayed; -
Status history- changes in the document statuses can be traced; -
Document- the generated ED envelope for the approved or sent documents to the SPFS is displayed. In case of documents in Draft status, the tab is not filled in;The figure below shows what the Document tab may look like for an approved ED501 (the document has been converted to SPFS format when approved).

ED501 message form - document tab
ED503
ED503 is used for the transmission of financial messages (SWIFT). Messages transmitted by such an envelope are subject to additional formatting and logical control in the SPFS, following the same rules that apply to SWIFT messages.
The SPFS user sends an ED503 to the MPC, which contains the financial messages for the transfer of funds. The SPFS user receives ED508 with information on the status of the message. If the control is successful, the MPC sends ED503 to the recipient.
Creating or importing an ED503 document is available to users who have the right to import a document as set in the authority settings. For the user who has the right to create a document, it is advisable to set the right to view it.

|
|---|
| Authority to create ED503 by the user |
Document ED503 must also be preconfigured with a signature model.
There are two ways to create an ED503 envelope:
- Import a ready-made (correctly composed) SWIFT message by clicking on the button
Import SWIFT. See section Importing ED503 for details; - Create message from screen form using the button
Create ED503. See section Creating ED503 via screen form for details;
It is also possible to automatically save ED503 incoming documents (see section Automatic saving of incoming messages) and to automatically print ED503 with message type SWIFT MT950 (see section Automatic printing of incoming and outgoing documents).
Importing ED503
The Transit Terminal provides allows the user to import files with SWIFT messages, which, for example, can in turn be uploaded from third-party software.
To import SWIFT message files, click on the button Import SWIFT and an Explorer window will open, in which the relevant files are selected for import. Imported SWIFT messages will be displayed in the tabular part with Draft status. If the configured signature model provides for sending a document without approval phases, it will be immediately transferred to further statuses.

|
|---|
| Example of imported ED503 documents |
Further, if the configured model provides for approval phases, the documents must be approved by selecting them and clicking on the button Agreement and send (Sign and send), and the documents will be sent to the MPC.

|
|---|
| Approval of ED503 |
Note that for a user who has approval authority over a document in the current phase, these documents will be highlighted in green in the tabular part. Thus, the green colour for the user is an indicator that these documents need to be approved.
The ED503 message can be considered to have been successfully processed by the SPFS MPC and sent on to the recipient once the ED501 is assigned the Sent to the Recipient of the SPFS status.
The fifth block is available when importing a document. If the fifth block is filled in in a SWIFT message, the block will also be filled in in the imported ED503. Below is an example of an imported SWIFT message with block 5:

|
|---|
| Imported ED503 with block 5 |
Important note: importing multiple SWIFT messages from a file is available. Thus, if you have two or more SWIFT messages in one text file, the import will create multiple ED503 documents according to the number of SWIFT messages in the file.
It is also possible to set up the automatic import of SWIFT messages from a specified directory at the desired frequency. Detailed description of automatic import settings for documents is given in section Automatic import of documents.
Creating ED503 via screen form
To create ED503 via screen form, you need to click on the button Create ED503, and a screen form will open where the following fields are provided:
-
Sender- select an organisation from the drop-down list. A list of organisations is formed according to the authority given to the current user; -
Receiver- is selected from the drop-down list in which SPFS participants are included according to the available directory. A text search by name, UIS and SWIFT BIC has been implemented. The field is available only after selecting the sender; -
MT type of SWIFT message- a three character numeric code corresponding to the type of MT message should be entered; -
Priority- selected from a drop down list; values available: Normal, System or Urgent. The value is involved in the automatic generation of SWIFT MT message technical blocks and does not affect the SPFS service. It is recommended to select Normal by default. -
Control over message delivery- selected from a drop down list; values available:Delivery notification,Non-delivery warning,Non-delivery warning and delivery notification. The value is involved in the automatic generation of SWIFT MT message technical blocks and does not affect the SPFS service. By default, it is populated with a Delivery Notification. -
Possible delivery period- filled in with a three-character number. Valid values:- 001 - this value is indicated if the possible delivery period is 5 minutes;
- 003 - this value is for urgent priority;
- 020 - this value is for normal priority; this is the default value, it is recommended to leave the default value;
-
Add data of 4 SWIFT message blocks- the fourth block of a SWIFT message (message body). You can either fill in the block manually or copy the data from the clipboard;
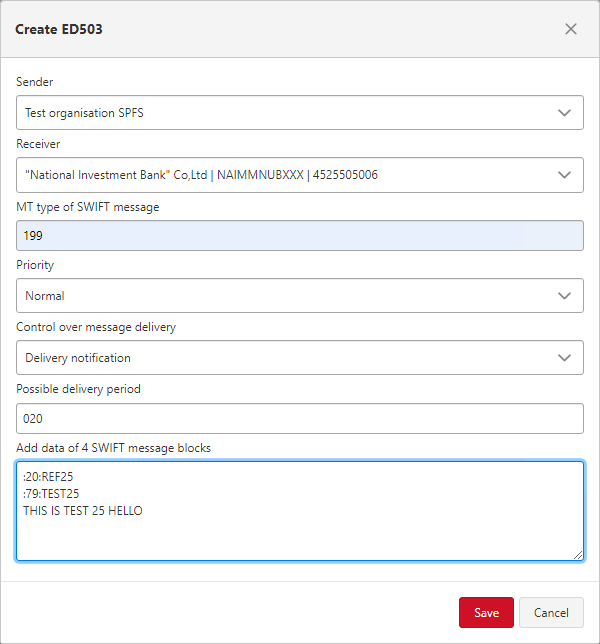
|
|---|
| Creating ED503 via screen form |
Once all fields on the form have been filled in, click the Save button.
When creating via screen form, technological fields (1, 2, 3) will be filled in automatically based on data already entered. Field 4 will be filled in according to the data entered on the form in the field Add data of 4 SWIFT message blocks. Block 5 will be automatically made empty.
The SWIFT message number is one of the components of block 1.
Block 2 of a SWIFT message is formed of the parameters Priority, Delivery control and Delivery period, i.e. (highlighted in bold): {2:I195NICBAZ22AXXXU2003}
where U is Priority, possible values:
- N - normal;
- S - system;
- U - urgent;
where 2 is Delivery control, possible values:
- 2 - delivery notification;
- 1 - delivery failure alert;
- 3 - delivery failure alert and delivery notification;
where 020 is Delivery period, with possible values:
- 020 - normal;
- 001 - system;
- 003 - urgent;
Please note: When completing a SWIFT message, it is assumed that:
- You have specialised software (ABS, ERP, SWIFT Alliance terminal, etc.) that generates messages in the required format;
- Your company has people with experience in creating SWIFT MT messages in the required categories (1nn to 9nn).
If the option Signing phases are not required is activated in the Signature Model settings for an ED503 document (see section Setting up the signature model), the document is sent to the MPC immediately after it has been created.
If the approval phase/phases are configured in the signature model settings, the document must be approved by an authorised user before it can be sent.
To approve the document, you need to tick it in either the first column or tick the checkbox in the Phases column and click on the Agreement / Sign button (or Agreement and send / Sign and send). The name of the button is dynamic, depending on what type the current phase is (signing or agreeing) and whether the current phase is the final phase.
The ED503 message can be considered to have been successfully processed by the SPFS MPC and sent on to the recipient once the ED501 is assigned the Sent to the Recipient of the SPFS status.
ED503 statuses
When ED503 is sent successfully, it passes the same statuses as ED501, namely:
- Draft - the document is in this status as soon as it is created;
- In the signing queue - the document moves to this status when it is being approved. This status is not relevant for documents with the signature model not providing approval phases. In this case, after the document is created, from the Draft status it is immediately moved to the Queued for sending status;
- In the queue for sending - the document is in the queue to be sent to NSD;
- Sending to NSD - this status is assigned after the document has been posted in the Integration Gateway folder, but before a reply receipt is received;
- Sent to NSD - this status is assigned after uploading the message to the Integration Gateway folder with confirmation of sending;
- Sent to service-bureau - this status is assigned after the document has been sent to the SPFS Service Bureau;
- Delivered to service-bureau - this status is assigned after the document has been delivered to the SPFS Service Bureau;
- Sent to the recipient of the SPFS - assigned when a positive ED508 (with status information of the electronic message) is received from the SPFS MPC (successful processing of the message in the MPC). This is the final status;
Important note: the positive ED508 received from the SPFS MPC will not be shown in the interface; in this case the document will be assigned the status Sent to the recipient of the SPFS, which will indicate that the positive ED508 has been received.
The statuses assigned in case of any errors are described in a section Error statuses.
ED503 - detail
Double left-clicking on ED503 opens a form detailing the document. The name of the modal window contains SPFS message number.
The following buttons are available on the form:
Download Document- the button allows you to download a document converted to SPFS format after the document has been agreed or sent. If the document is in Draft status, the SWIFT message is downloaded in txt format;Download SWIFT- the button downloads the SWIFT message in txt format (decoded message). The same message appears on the tabSWIFT;Refresh- the form is updated according to the latest data on the document;
The following tabs are available on the form:
-
Details- the document parameters and their values are displayed; -
Status history- changes in the document statuses can be traced; -
Document- the generated ED envelope for the approved or sent documents to the SPFS is displayed. In case of documents in Draft status, the tab is not filled in;The figure below shows what the Document tab may look like for an approved ED503 (the document has been converted to SPFS format when approved).

ED503 message form - document tab -
SWIFT- the SWIFT message (decoded message) is displayed. The same message in txt format can be downloaded to the user’s computer using the buttonDownload SWIFT.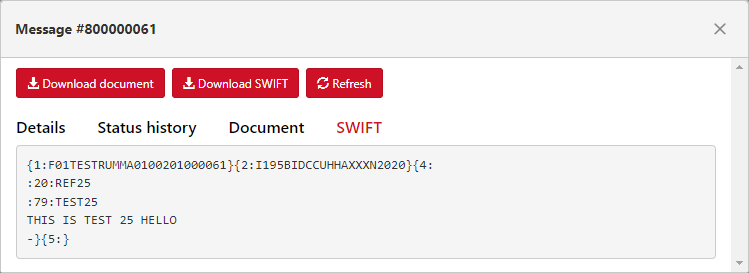
ED503 message form - SWIFT tab
Editing ED503
It is possible to edit an ED503 document in Draft status.
To edit a ED503 document, select it in the tabular part and click on the button Edit. The form Edit the SWIFT message will open where you need to edit the data in the fields you need and click on the Save buttonafterwards.
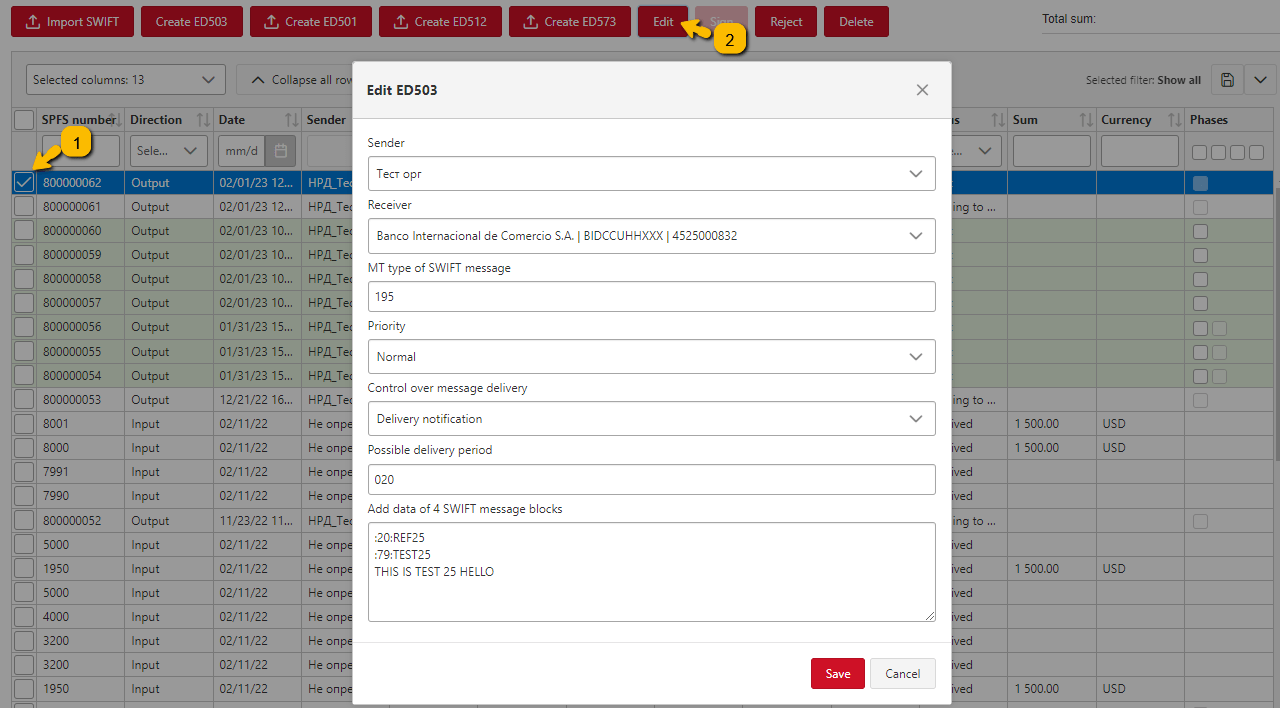
|
|---|
| Editing ED503 |
Important note: only ED503 documents can be edited. This is not possible for other SPFS documents.
ED506
ED506 is an envelope for transmitting financial messages in ISO format. It is prepared by the participant and contains messages in ISO 20022 format.
The prepared ED506 envelope is sent to the CSP. Upon receipt of the ED506 envelope, the CSP must perform the following regulatory controls: authentication, structural control, duplication control, logical control of the envelope for financial messages, after which it additionally checks the admissibility of the exchange of electronic messages by the participants through the CSP, as well as the uniqueness of the TSLC/ISO messages within the electronic message. In case of an unsuccessful result of any of the listed controls, the CSP sends an ED201 message to the participant - the sender, indicating the control result code, and the document flow for this electronic message is terminated. In this case, the Transit Terminal will assign the status Rejected by SPFS control to the document being searched for, the document will be highlighted in red and you will be able to see the corresponding error text for the document being searched for (the ED201 envelope is not displayed in the Transit Terminal - only the corresponding status and error text). For more information, see the section Statuses when errors occur.
If the above checks are passed, then the CPS performs routine checks of the financial message within this envelope: structural, logical. If the routine checks of the financial message within the ED506 electronic message fail to pass, the CPS sends ED507 to the address of the participant - sender with information about the financial message from ED506 that did not pass the check. In this case, the document in question will be assigned the status Rejected by SPFS control in the Transit Terminal, the document will be highlighted in red, and you will be able to see the corresponding error text for the document in question (the ED507 envelope is not displayed in the Transit Terminal - only the corresponding status and error text).
If the financial message in the ED506 envelope successfully passes the regulatory controls, the CSP sends an ED507 electronic message to the sender participant, and then the CSP sends the ED506 envelope to the recipient participant.
The creation of ED506 is available to users who have the right to import the document set in the permissions settings. It is logical for a user who has the right to import the document to also set the right to view.

|
|---|
| Rights to create ED506 by the user |
Also, the signing model must be pre-configured for the ED506 document.
To create an ISO (ED506) message, click the Create ED506 button, a modal window will open where you need to do the following:
-
In the
Sender field, select the sender organization from the list (the list is generated in accordance with the import rights issued to the user); -
In the
Counterparty field, select the SPFS participant to whom the current envelope is sent from the list of participants. Text search by name, UIS and KP (SWIFT BIC) is implemented for the counterparty. The field is available only after selecting the sender; -
Click the
Add filebutton, an explorer window will open where you need to select a financial message in ISO 20022 format.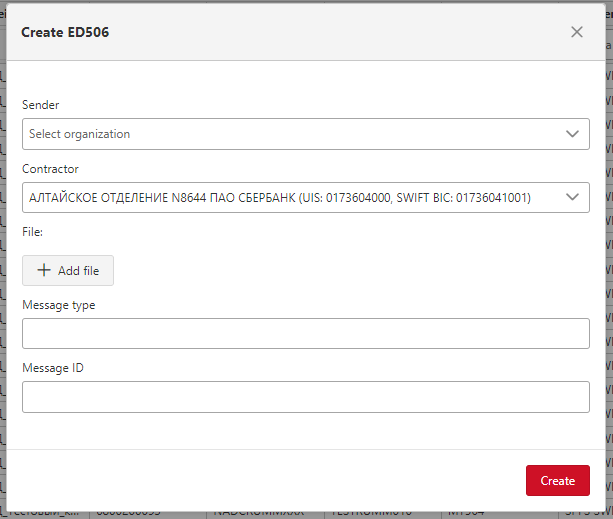
Creating ED506 - selecting a file
Note: you can add only one attachment (only one financial message is included in one ED506 envelope).
- After the message file is selected, the
Message TypeandMessage IDfields will be filled in automatically in accordance with the contents of the selected file.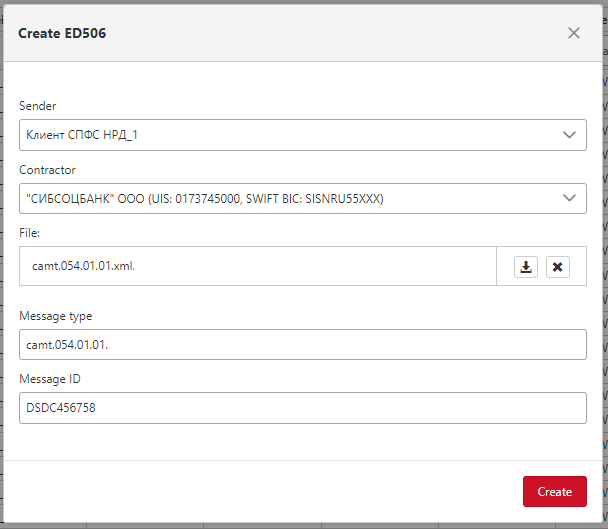
Creating ED506
You can download the attachment by clicking the button
![]() . You can delete the attachment file by clicking the button
. You can delete the attachment file by clicking the button
![]() (for example, if you selected the wrong file by mistake).
(for example, if you selected the wrong file by mistake).
Next, you need to click the Create button. The created ED506 message will be displayed in the tabular section.
If the option No signing phases required is activated in the signing model settings for the ED506 document (see the section Setting up the signing model), then after creating the document, the document is immediately sent to the SPFS Service Bureau. If the approval phase/phases are configured in the signing model settings, then before sending the document, the document must be approved by a user with the appropriate authority.
The approval process is the same for all types of documents. Detailed examples of signing documents can be found in the examples of Currency Transfers and Payment Orders in the sections Signing Currency Transfers and Signing Payment Orders and Registers.
Please note that for a user who has the authority to approve a document in the current phase, the documents in the table section will be highlighted in green. Thus, the green color is an indicator for the user that these documents need to be approved.
After ED506 has been created and approved, it is sent to the final recipient. It can be considered that the ED506 message has been successfully processed in the SPFS CSP and sent further to the recipient as soon as the sought ED506 document is assigned the Sent to SPFS recipient status.
The composition of the tabs and buttons on the form for the ED506 document is similar to the ED501 document. In view of this, the description of the tabs and buttons can be viewed using the ED501 example in the ED501 - detailed information section.
The ability to automatically save incoming ED506 documents has also been implemented (see the Automatic saving of incoming messages section).
ED506 statuses
When the ED506 document is successfully sent, it goes through the same statuses as the ED501 document, namely:
- Draft - the document is in this status immediately after creation;
- In the signing queue - the document goes to this status after approval. This status is not relevant for documents whose signing model does not provide for approval phases. In this case, after the - document is created, it immediately changes from the Draft status to the In the sending queue;
- In the sending queue - the document is in the sending queue to the NSD;
- Sending to the NSD - this status is assigned after the document is posted in the Integration Gateway folder, but before the response receipt is received;
- Sent to the NSD - this status is assigned after the message with the sending confirmation is posted in the FS folder;
- Sent to the service bureau - this status is assigned after the document has been sent to the SPFS service bureau;
- Delivered to the service bureau - this status is assigned after the document is delivered to the SPFS service bureau;
- Sent to the SPFS recipient - assigned upon receipt of ED507 (with information on the status of the electronic message) from the SPFS CSP (successful processing of the message in the CSP). This is the final status;
Important: ED507 received from the SPFS CSP is not displayed in the interface, in this case the document is assigned the status Sent to the SPFS recipient, which will indicate the receipt of ED507.
The statuses assigned in the event of any errors are described in a separate section Statuses when errors occur.
ED514
ED514 is an envelope for transmitting financial messages in the SWIFT MX format. It is compiled by the participant and contains financial messages about the transfer of funds in the SWIFT MX format.
The prepared ED514 envelope is sent to the CSP. Upon receipt of the ED514 envelope, the CSP is required to perform regulatory controls: confirmation of authenticity, structural control, duplication control, logical control of the envelope for financial messages (excluding financial messages in the SWIFT MX format), after which an additional check is carried out on the admissibility of the exchange of electronic messages by participants through the CSP. In case of failure of any of the listed controls, the CSP sends an ED201 message to the participant - sender indicating the control result code and the document flow for this electronic message is terminated. In this case, the sought document will be assigned the Rejected by SPFS control status in the Transit Terminal, the document will be highlighted in red and you will be able to see the corresponding error text for the sought document (the ED201 envelope is not displayed in the Transit Terminal - only the corresponding status and error text). For more details, see the section Statuses when errors occur.
If the above controls are passed, then the CSP performs routine controls of the financial message as part of this envelope: structural, logical. In case of failure of routine controls of the financial message as part of the ED514 electronic message, the CSP sends an ED515 to the participant - sender with information about the financial message from ED514 that did not pass the control. In this case, the document in question will be assigned the status Rejected by SPFS control in the Transit Terminal, the document will be highlighted in red, and you will be able to see the corresponding error text for the document in question (the ED515 envelope is not displayed in the Transit Terminal - only the corresponding status and error text).
If the financial message in the ED514 envelope successfully passes the regulatory controls, the CSP sends the ED515 to the sending participant, and then the CSP sends the ED514 envelope to the receiving participant.
The creation of ED514 is available to users who have the right to import the document set in the permissions settings. It is logical for a user who has the right to import the document to also set the right to view.

|
|---|
| Rights to create ED514 by the user |
Also, the signing model must be pre-configured for the ED514 document.
In order to create a message in the SWIFT MX (ED514) format, you must click the Create ED514 button, a modal window will open where you must perform the following actions:
-
In the
Senderfield, you must select the sender organization from the list (the list is generated in accordance with the rights granted to import to the user); -
in the
Counterpartyfield, from the list of participants, you must select the SPFS participant to whom the current envelope is sent. For the counterparty, a text search by name, UIS and CP (SWIFT BIC) is implemented. The field is available only after selecting the sender; -
click the Add file button, an explorer window will open, where you must select a financial message in the SWIFT MX format.
Note: you can add only one attachment (only one financial message is included in one ED514 envelope).
- after the message file is selected, the
Message TypeandMessage IDfields will be filled in automatically in accordance with the contents of the selected file.
You can download the attachment by clicking the button
![]() . You can delete the attachment file by clicking the button
. You can delete the attachment file by clicking the button
![]() (for example, the wrong file was selected by mistake).
(for example, the wrong file was selected by mistake).
-
if necessary, set the
Send notification of receiptoption. If this option is set, an ED598 (notification of message receipt by the recipient SPFS user) will be sent to the ED514 sender with information that the recipient SPFS user has received the message from the sender SPFS user. When an ED598 is received in the Transit Terminal, the document will be assigned the Delivered to SPFS recipient status (the ED598 envelope itself will not be displayed in the Transit Terminal).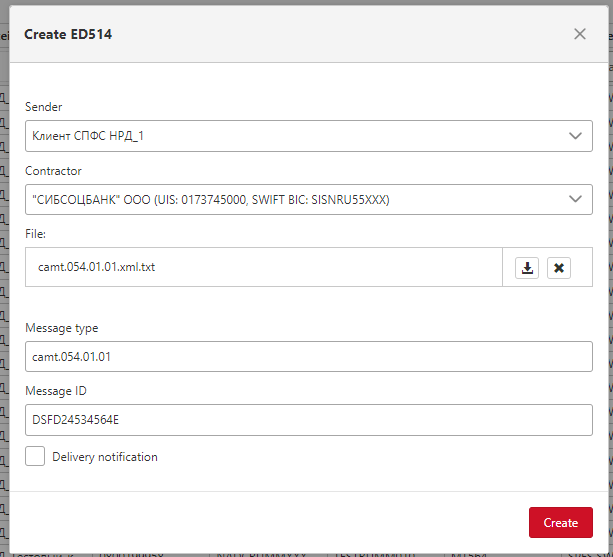
Creating an ED514 - notification of receipt -
click the Create button. The created ED514 message will be displayed in the tabular section.
If the option No signature phases required is activated in the signature model settings for the ED514 document (see the section Setting up the signature model), then after creating the document, the document is immediately sent to the SPFS Service Bureau. If the approval phase/phases are configured in the signing model settings, then the document must be approved by a user with the appropriate permissions before sending it.
The approval process is the same for all types of documents. Detailed examples of document signing can be found in the Currency Transfers and Payment Orders examples in the sections Signing Currency Transfers and Signing Payment Orders and Registers.
Please note that for a user with permissions to approve a document at the current phase, the documents in the table section will be highlighted in green. Thus, the green color is an indicator for the user that these documents must be approved.
After ED514 has been created and approved, it is sent to the final recipient. It can be considered that the ED514 message was successfully processed in the SPFS DSP and sent further to the recipient as soon as the sought ED514 document is assigned the status Sent to the SPFS recipient (if the Send acceptance notification option was set, the final status will be Delivered to the SPFS recipient).
The composition of the tabs and buttons on the form for the ED514 document is similar to the ED501 document. In view of this, the description of the tabs and buttons can be viewed using the ED501 example in the ED501 - detailed information section.
The ability to automatically save incoming ED514 documents has also been implemented (see the Automatic saving of incoming messages section).
ED514 statuses
When the ED514 document is successfully sent, it goes through the same statuses as the ED503 document, namely:
- Draft - the document is in this status immediately after creation;
- In the signing queue - the document goes to this status upon approval. This status is not relevant for documents whose signing model does not provide for approval phases. In this case, after the document is created, it immediately switches from the Draft status to the In the sending queue;
- In the sending queue - the document is in the sending queue to the NSD;
- Sending to the NSD - this status is assigned after the document is posted to the Integration Gateway folder, but before the response receipt is received;
- Sent to the NSD - this status is assigned after the message with the sending confirmation is posted to the FS folder;
- Sent to the service bureau - this status is assigned after the document has been sent to the SPFS service bureau;
- Delivered to the service bureau - this status is assigned after the document is delivered to the SPFS service bureau;
- Sent to the SPFS recipient - assigned upon receipt of a positive ED515 (with information on the status of the electronic message) from the SPFS CSP (successful processing of the message in the CSP). This is the final status for documents with the Send Notification of Acceptance option disabled;
- Delivered to SPFS recipient - assigned upon receipt of ED598 (notification of message acceptance by the recipient SPFS user) with information that the recipient SPFS user has received the message from the sender SPFS user. This is the final status for documents with the Send Notification of Acceptance option enabled.
Important: a positive ED515 received from the SPFS COS is not displayed in the interface; in this case, the document is assigned the status Sent to SPFS recipient, which will indicate the receipt of a positive ED515.
Statement
When an incoming ED503 with message type MT950 is received, an incoming document appears in the SPFS section (see section Incoming SPFS Documents). At the same time, a Swift type document is generated in the section Statements.
The current user can view these statements if the user settings for the SPFS Account and Statement document type have the View permission enabled.
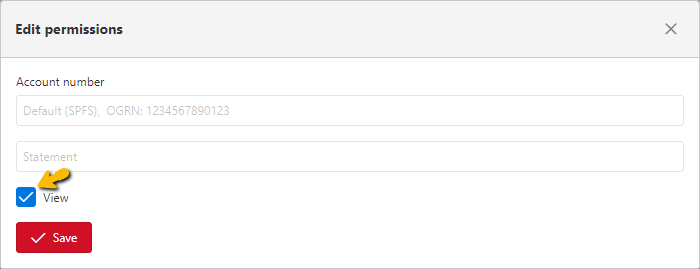
|
|---|
| Rights to view SPFS account statements |
The illustration below shows incoming document ED503 with message type MT950 displayed in the SPFS section:

|
|---|
| Incoming document ED503 with Message Type MT950 |
The illustration below shows the statement in the Statements section generated from the document ED503. The statement you need can be downloaded in several formats. To do so, left-click on the line with the statement. An additional line with buttons with format names will open.To save the statement in the format you need, click on the button with the required format name. The statement will be saved to the user’s computer.

|
|---|
| Statement based on ED503 with MT950 |
To view detailed information on a statement, double left click on the line with the statement. A modal window will display detailed information on the debit and credit turnover. Here the user can also filter and sort data, download 1C or open a printable document form (PDF).

|
|---|
| Details of the statement |
Incoming SPFS documents
Incoming documents ED501 and ED503 are displayed in the tabular section with Input direction and Received status.
The figure below shows an example of how incoming documents ED501 and ED503 are displayed in the tabular part in the tabular part SPFS:

|
|---|
| Incoming Documents in the tabular part |
In the tabular part in the Date column the date for incoming messages is displayed in MM/DD/YY format without time indicated.
It is possible to view detailed information for incoming documents, as well as for outgoing ones, by double clicking on the document in the table. A form will open where you can view detailed information, download an attachment (SWIFT message) and the document itself. A detailed description of this form can be found in sections ED501 - detail and ED503 - detail.

|
|---|
| Detailed information on the incoming document |
Error statuses
Various errors can occur during the processing of SPFS documents. If an error occurs, the document will be given a relevant status, such as Sending error, Delivery error, Rejected by SPFS control, Terminal error, or Convertation error may occur.
Rejected by SPFS control for ED512, ED573 and ED501 is given when an ED201 response message is received from the SPFS MPC. Rejected by SPFS control for ED503 is given when ED201 or a negative ED508 is received in response from the SPFS MPC. In turn, ED201 is a notification of control results and ED508 contains information on the status of the electronic message.
Important note: ED201 or negative ED508 received from MPC are not shown in the tabular part of the interface in any way. When these messages are received, the user will see the relevant status, Rejected by SPFS control and will also see the error text. See below for examples.
The document with the error will be highlighted in red in the tabular part and will be given the relevant error status. The illustration below shows an example of ED512 documents with errors:

|
|---|
| ED512 documents with an error in the tabular part |
You can see the details of the error by left-clicking on the document, as shown in the figure below. In this case, the document was rejected by the SPFS control due to an incorrect message date:

|
|---|
| ED512 - detailed information about the error in the tabular part |
You can also see the error message when viewing the detailed information of the document by double-clicking on it (a form will open in another window).
The figure below shows an example of an error occurring for document ED503 during the SPFS control phase. The document is highlighted in red and has been assigned the relevant status Rejected by SPFS control, the document has been rejected due to an incorrectly drafted SWIFT message. Open the detailed information or click once with the left mouse button and you will see the detailed information on the error:

|
|---|
| ED503 - rejected at the phase of the SPFS control |
The following figure also shows an example of an error occurring for document ED503 during the SPFS control phase (Rejected by SPSS Control status is assigned). In this case, the document was rejected because the recipient did not give permission to send this type of MT message. Open detailed information or left click once and you will see detailed information about the error:

|
|---|
| ED503 - rejected at the stage of the SPFS control |
The status for other SPFS documents (ED501 and ED573) is similarly assigned when an error occurs, the document is highlighted in red and the error information can be viewed in the ways described above.
Automatic saving of incoming messages
It is possible to automatically save incoming messages ED501 and ED503 in the Transit Terminal.
To enable this feature, you need to go to the administrator’s settings panel in the section Accounts and open the SPFS account card. In the SPFS account card:
- set the option
Autosave ED501/Autosave ED503in the settings; - select the format for saving the document:
Packageand/orAttachment, documents can be saved in both formats if needed; - in the
Format of package file ED501(/ED503)andFormat of attachment file ED501(/ED503)fields you can specify the naming pattern for the package file and the attachment file respectively. The following variables can be used in the naming pattern: DD, MM, YYYY, YYYY - date, month, year of document creation; HH, mm - hours and minutes of document creation; GUID - unique identifier; ORG - organisation name; N - number of SPFS document; UC - SPFS user code; - specify the path to the message saving directory on the Transit Terminal server;
- save the entered settings by pressing the
Savebutton.
The illustration below shows an example of the settings for automatic saving of ED501 and ED503 incoming documents.
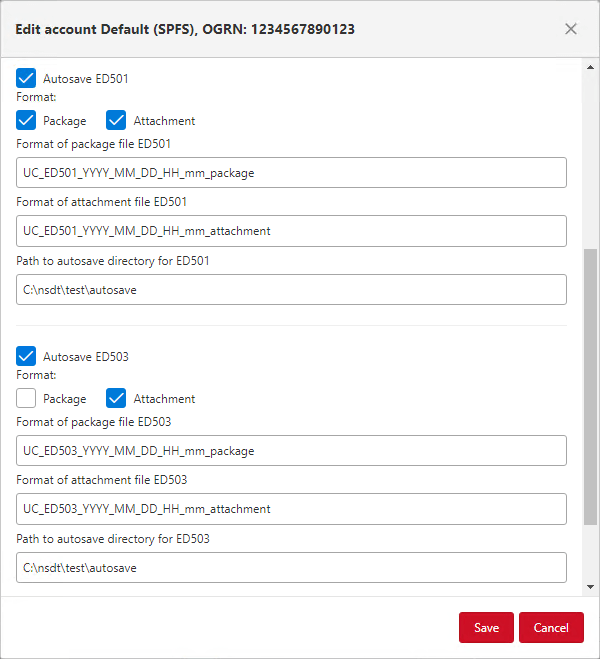
|
|---|
| Enable automatic saving of incoming documents |
If an invalid (non-existent) directory path is specified, an error will occur when trying to save the account:
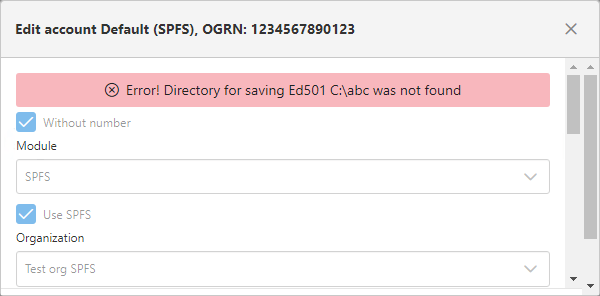
|
|---|
| Error when saving the account - invalid path |
If the automatic save setting is on, you will see the following when you receive an incoming message ED501:

|
|---|
| Received incoming message ED501 |
the document will be saved in the specified directory on the Transit Terminal server in the specified formats, in this example, as a package and as an attachment:

|
|---|
| Saving an incoming document to the Transit Terminal Server |
A file with the word attachment in its name is an attachment and a file with the word package in its name is a package. An attachment is the attachment itself received in a message sent with an ED501 envelope. Package is an XML file with the ED envelope.
Similarly, when ED503 is received, a package or/and attachment will be saved in the directory you need on the Transit Terminal server. The attachment for ED503 will be the SWIFT message itself in txt format and the package will be saved as an XML document with the ED envelope.
Important note: this setting can be used for integration with ABS (Automated Banking Systems). It is assumed that in this case, documents will be exchanged through shared file folders.
Automatic printing of incoming and outgoing documents
The SPFS module implements automatic printing of incoming and outgoing documents. This option only applies to ED503 documents.
To enable automatic printing of incoming/outgoing documents, go to Banking modules in the admin settings panel, select the SPFS module on the left side of the list of banking modules and enable the Automatically print documents option. Additionally, the boxes MT type groups for incoming documents and MT type groups for outgoing documents will be displayed where only those MT message categories (incoming and outgoing) that need to be automatically printed when receiving/sending ED503 should be checked. An additional field Printer for printing will also appear, where you must select one of the connected printers on the Transit Terminal server from the drop-down list. Once the settings have been entered, the Save the configuration of the selected module button must be pressed.
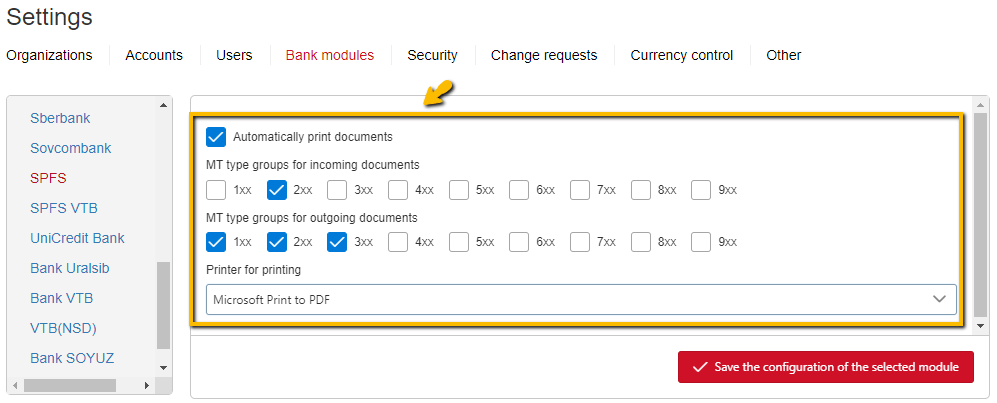
|
|---|
| Enabling automatic printing of documents |
When incoming ED503 documents are received with the MT message categories checked in the bank module settings, these documents will be printed on the selected printer.
Similarly, when ED503 documents are sent to the SPFS Service Bureau (outgoing) with the message categories ticked in the banking module settings, these documents will be printed on the selected printer.
Please note: If the Automatically print documents option is enabled, it will print incoming ED503 documents with message type MT950 (statements) by default regardless of whether the 9xx category is checked in the bank module settings. If you wish to print other types of MT messages from category 9xx other than MT950, you will need to enable the required check box in the settings.
The MT950 incoming message is printed as a statement, such as the one shown below:
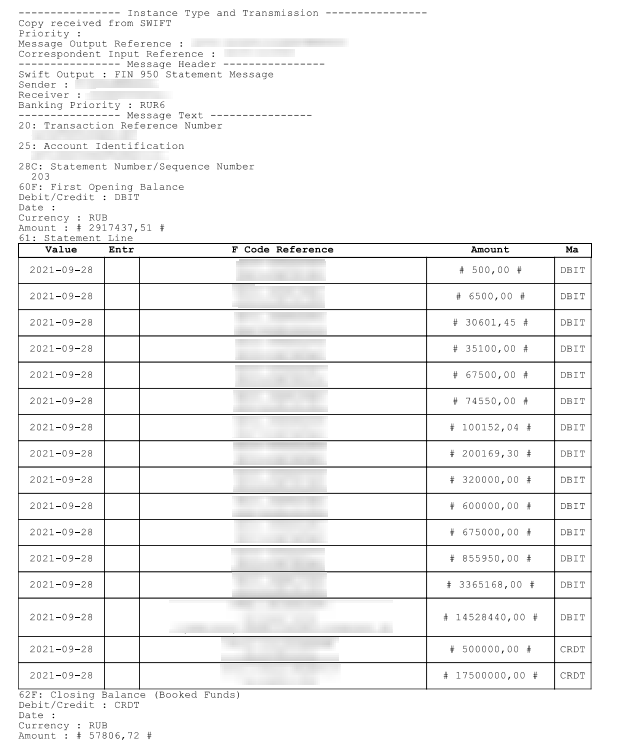
|
|---|
| Print MT950 Inbox |
In case of all other incoming message types and all outgoing message types (including outgoing MT950 message type), a SWIFT message will be printed:

|
|---|
| Print SWIFT message |
Control of the operation day
The SPFS module provides enabling of the operating day control. This functionality is provided in order to display additional visual prompts to the user in the SPFS section and on the forms of document creation in case the set operational day differs from the date set on the server of the Transit Terminal.
This functionality for the SPFS module is enabled in the administrator settings panel in the Banking modules section by the Operational day control option:

|
|---|
| Enabling Operational Day Control |
Option is enabled:
-
in case the date of the operational day differs by more than one day from the date set on the server of the Transit Terminal, the date of the operational day will be highlighted in red color in the SPFS section, a tooltip will pop up when putting the mouse cursor over the date:

Operational day highlighting and warning message Additionally, the warning will be displayed on the forms of creating documents ED512, ED501, ED503, ED504, ED506:
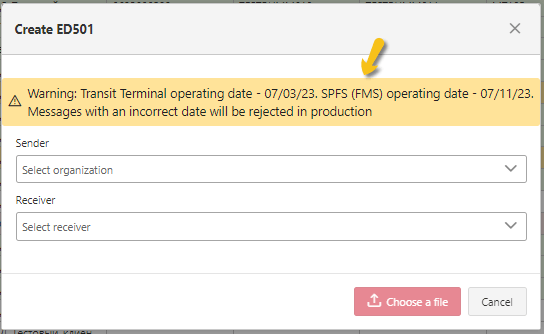
Warning on the creating document form -
if the date of the operating day differs by one day from the date set on the server of the Transit Terminal, the date of the operating day will be highlighted in yellow color in the SPFS section, a tooltip will pop up when the mouse cursor is placed over the date (the tooltip text is the same as in the figure Operating day highlighting and warning). Additionally, a warning will be displayed on the ED512 document creation form. The warning is not displayed for documents ED501, ED503, ED504, ED506 in this case.
-
if the date of the operational day coincides with the date set on the server of the Transit Terminal, the date of the operational day is displayed without highlighting. Accordingly, no additional warnings appear on the forms of document creation.
Note: Comparison of the date of the operational day with the date set on the server of the Transit Terminal is performed taking into account the time zone (local time is converted to Moscow time).
Please note: it is recommended to enable functionality of the operating day control only on the production segment. It is not advisable to use this functionality for the test segment, because on the test segment the operating day date differs from the current one.
Rejecting SPFS documents
There is the button Reject in the СПФС section which allows you to move the document from Draft status to Rejected by User status, as well as from Pending to Rejected at the control phase.
The button is active only for documents in Draft or Pending statuses, provided that the user has enabled the authority Rejection in the settings for the account.
To reject a document, it must be ticked and then the button Reject must be clicked.

|
|---|
| Rejecting SPFS documents |
Documents after rejection (in statuses Rejected by user and Rejected at control phase) continue to be displayed in the tabular part and highlighted in red.
It is possible to reject several documents at once by ticking them all and clicking the button Reject.
Deleting SPFS documents
There is the button Deletein the SPFS section which allows you to delete documents in Draft, Terminal Error, Rejected at control phase, Send Error and Conversion Error statuses.
The button is activated only for documents in the above statuses, provided that the user has enabled authority Delete in the settings for the account.
To delete a document, it must be ticked and then the button Delete must be clicked.

|
|---|
| Deleting SPFS documents |
The document will be deleted and disappear from the tabular part.
It is possible to delete several documents at once by ticking them all and clicking the button Delete.
Saving table display settings
In the Transit Terminal, it is possible to save tabular display settings (various filters, sorting, column display). You can save as many settings as you like, and then switch between these settings.
Let’s say we want to configure the tabular part to display ED501 documents. In this example, we want to display only the columns relevant to ED501, we want the tabular part to show only ED501 documents, and we want to sort by direction of messages: first, we want to see all outgoing messages and then all incoming messages. You can make any other setting requirements.
To save the filter with the settings described above, proceed as follows:
-
Click on the icon on the right side above the table
 . This will open a pop-up window with the settings. Enter a name for the filter in the input field below, preferably a name that is intuitive (i.e. expresses the essence of the filter being configured). In our case, we will call the filter “ED501”. Then you should click the icon
 .
.
Adding a new filter -
select the filter saved in step 1 (click on the circle icon next to the filter name) and then left-click on any area outside the pop-up window.

Switching to the filter Then we will see the name of the selected filter above the tabular part, in this example “ED501”:

Selected filter -
In this step, we will make the tabular part of the table display the way we need:
-
select only columns relevant to ED501 (uncheck the columns used exclusively to SWIFT messages):

Selection of columns to be displayed -
set filter by Document type field, select ED501:

Set filter by document type ED501 -
sort the tabular part by the Direction field (to sort, left-click on the arrows to the right of the column header, one click to sort in ascending order, two click to sort in descending order).

Sorting the tabular part
-
-
In the last step, save the settings entered in step 3. Just click on the floppy disk icon on the right side above the tabular part:

Saving filter settings
The other filters are set up similarly; in step 3, you decide in which view you want to see the tabular part.
Next, click on the icon
![]() to switch between the filters. You select the filter in the pop-up window (click the circle icon next to the filter name) and then click the left mouse button anywhere outside the pop-up window.
to switch between the filters. You select the filter in the pop-up window (click the circle icon next to the filter name) and then click the left mouse button anywhere outside the pop-up window.

|
|---|
| Switching the filter |
If necessary, you can remove a previously configured filter by clicking on the bin icon next to the filter and then confirming the removal in another window.
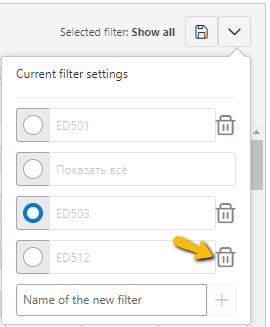
|
|---|
| Removing a filter from the list |
The default filter, Show All, cannot be deleted or overwritten. If you try to overwrite the filter, an error will occur:

|
|---|
| Error when saving the filter Show all |
Additional information
The sections below describe functionality that may be useful when working with SPFS.
Signing of SPFS documents
The SPFS subsection provides a Sign/ Agreement button for those accounts for which the configured model includes approval phases.
The name of the button is dynamic depending on whether the current phase is of signature or approval type. If the type is Sign, the button will be named “Sign and Send” or “Sign” (in case several signatures are set up and the signature to be given is not the final signature). Similarly, if approval has set up, the button is called “Agreement and Send” or “Agreement” (in case more than one approval phases are set up and the current approval is not final).
Example:
Below we will look at one possible example of signing documents depending on the settings you have made. We will take ED503 as an example. The signing process is the same for all other documents.
Let’s assume that the signature model set up includes two phases, the first with type Sign and the second with type Agreement:
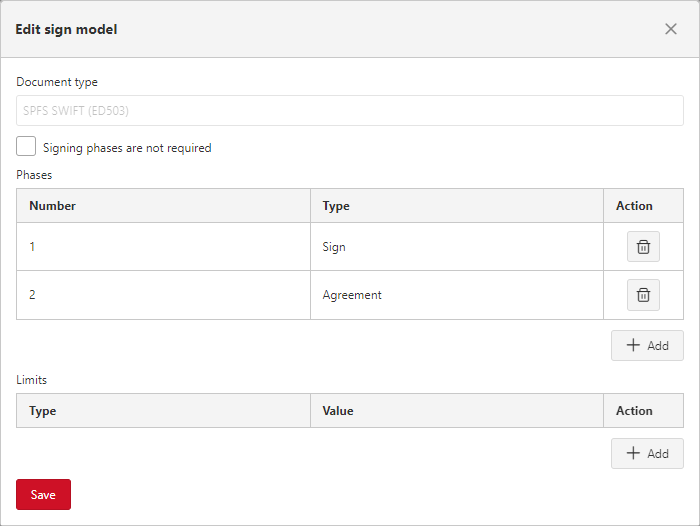
|
|---|
| Setting up a signature model |
User A has been set up in the Transit Terminal, for which permissions have been set up and phase 1-Sign has been specified:
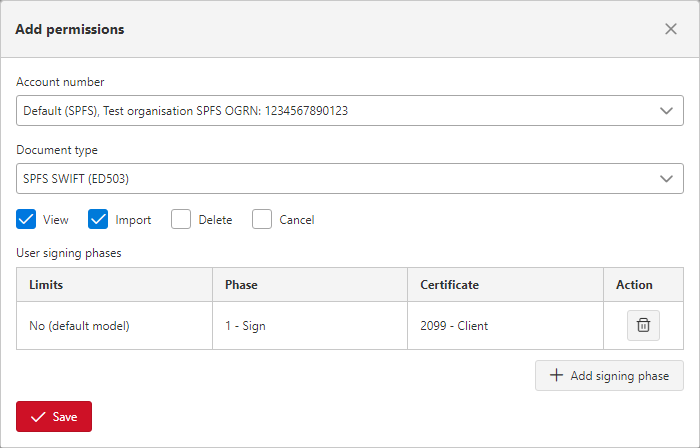
|
|---|
| Setting up User A’s permissions |
User B has been set up in the Transit Terminal, for which permissions have been set up and phase 2-Agreement has been specified:
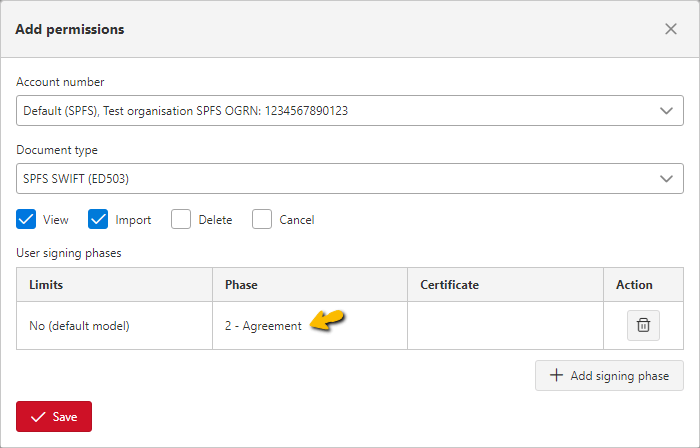
|
|---|
| Setting up User B’s permissions |
In the account settings, Hierarchical is selected as the type of signature model. This means that the order of the signing/approval phases can be any order. Thus, User B can be the first to approve the document (second phase) and then User A can sign the document (first phase). For more information on the existing signature model types in the Transit Terminal, see Signature model types.
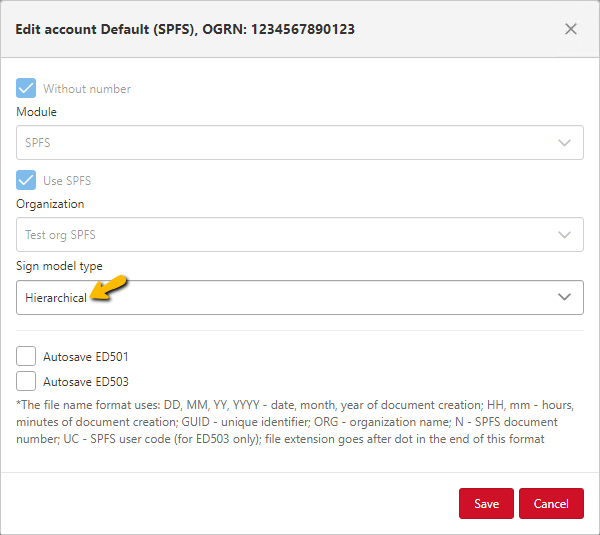
|
|---|
| Account settings |
In order for User B to approve ED503 documents, the user need to tick the required phase in the column Phases(the user can pre-filter the table part for convenience), and click on the button Agreement.

|
|---|
| Approval of documents by User B |
The documents will go to status Under control.
In order for User A to sign ED503 documents, it is necessary to tick the required phase in the column Phases (for convenience, the table part can be filtered), and click on the button Sign and send.

|
|---|
| Signing documents by User A |
Once all approval phases have been completed, ED503 documents will be sent to the SPFS MPC for onward shipment to the final recipient.
Signature model types
The Transit Terminal provides the ability to configure the order in which electronic signatures are applied to documents before they are sent to the SPFS MPC. The type of signature model is specified in the account settings.
Two types of signature models are available:
- Sequential signature model means that signatures are made in strict sequence one after the other according to the configured phases;
- Hierarchical signature model means that signatures are made in any sequence;
Sequential signature model
Let’s look at an example where Sequential have been set as a signature model type in the account settings.
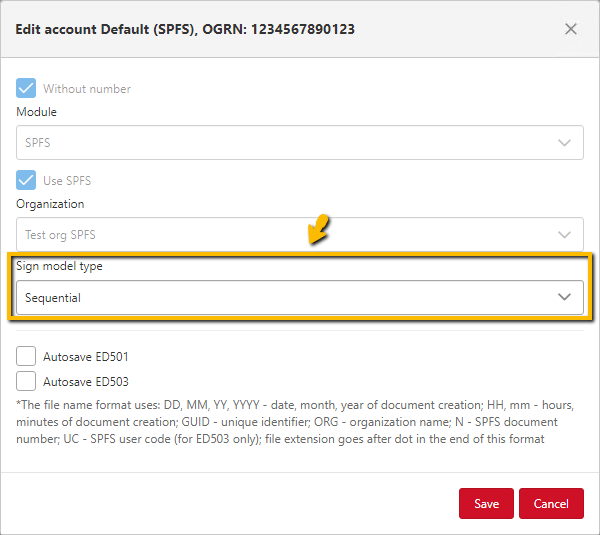
|
|---|
| Account settings - sequential signing |
Suppose the account signature model setting specifies two approval phases:
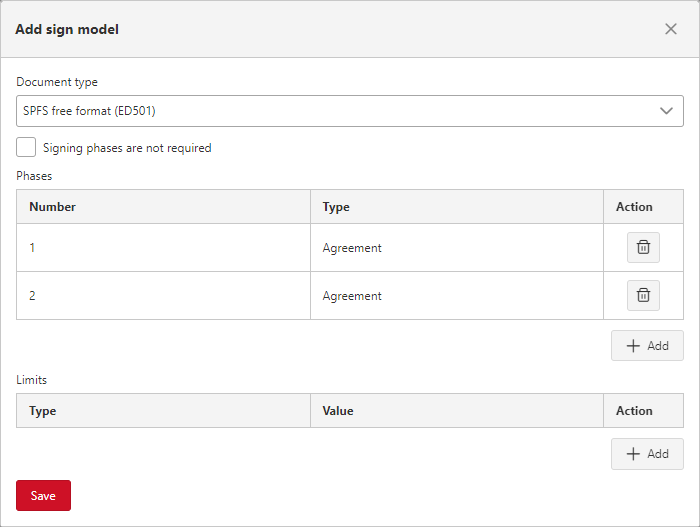
|
|---|
| Setting up a account model |
The permission settings for the user being searched are set to Agreement in Phase 2 (the last phase), i.e. this user is performing Phase 2 approval. Note that the user must have View permissions in order for the documents for the account being searched to be displayed in the tabular portion for that user.
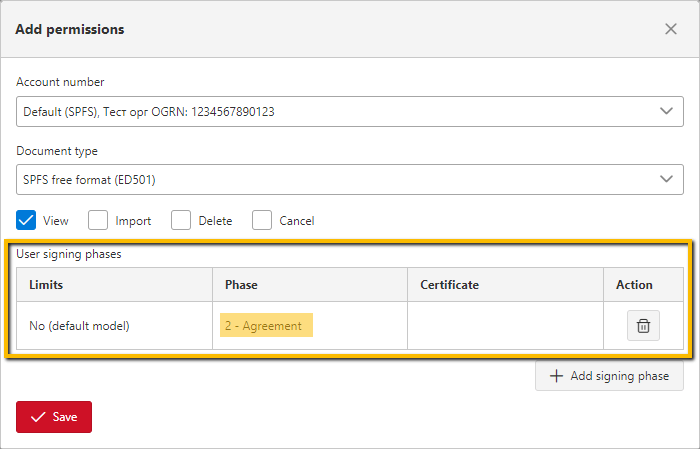
|
|---|
| Setting up user permissions |
The checkboxes for none of the phases are active in the SPFS section of the tabular part in the Phases column. The first phase is inactive because the current user has no authority to negotiate this phase. The second phase is inactive because the first phase has not yet been approved, and consecutive approval (signing) implies that the user can only approve (sign) the document when the document has been approved (signed) in all previous phases.

|
|---|
| Signing phases - consecutive signing |
Once the first phase has been approved by other user, the checkbox for the second phase will become active for the user. In this way, the user can approve on the second phase for all documents by activating the checkboxes for the desired phase and clicking on the button Agreement and send.
The Transit Terminal provides the option to enable all phase checkboxes for filtered table entries at once. To do this, the checkbox for the phase to be signed must be enabled on the top row of the table.

|
|---|
| Setting up an account model - consecutive signing |
Hierarchical signature model
Now let’s look at an example where the signature model type is selected as Hierarchical.
In the account settings, the hierarchical signature model type is specified accordingly:
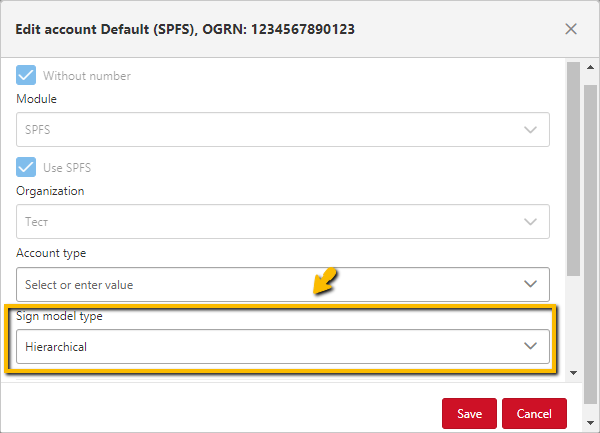
|
|---|
| Account settings - sequential signing |
Let the account model settings and authority settings for this account be the same as for the sequential model example, i.e. two phases of approval in total and the current user has authority to approve the second phase.
In this case, in contrast to the sequential signature model, even though the first phase has not yet been approved, the user can agree on the second phase, because in the hierarchical signature model, the order of approval (signature) phases is not important:

|
|---|
| Setting up the account model - hierarchical signing |
Changing user password
Administrator can change the password of any user in the Users section. You can change your own password in the Profile section.
In order to change any other user’s password, double-click the left mouse button on the line with the user you are looking for. In the modal window that will open, press the button Change password, enter a new password in the fields that will appear and press the button Save:
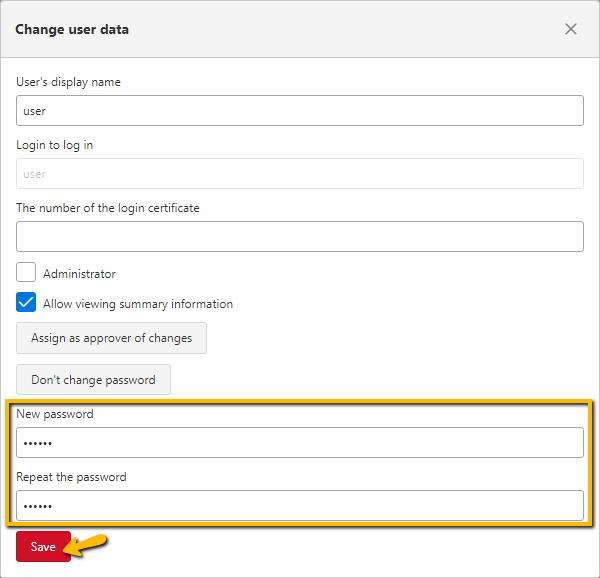
|
|---|
| Changing user password |
Copy user permissions
If you need to assign the same authority to a large number of users, the Transit Terminal provides a user authorisation copying function.
In order to copy a user’s permissions to other users, it is necessary to:
- click on the line with the user whose permissions are to be copied, the button
Copy user permissionswill appear;
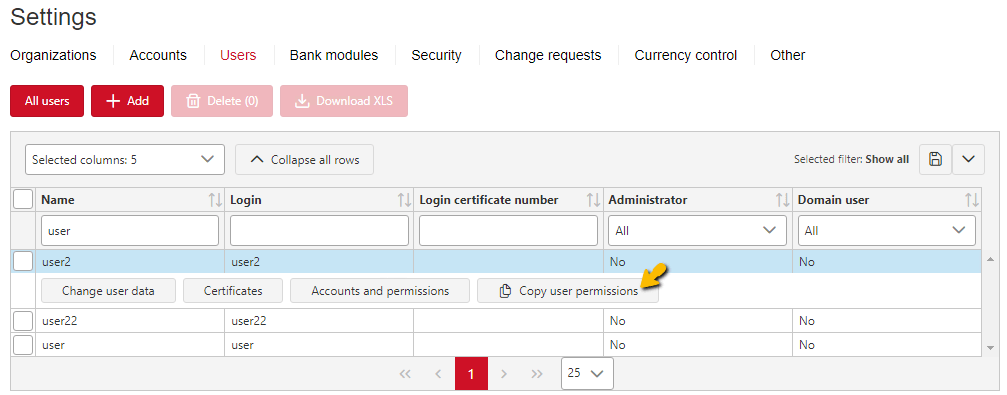
|
|---|
| Copy user permissions - the button in the tabular part |
- press
Copy user permissions; - in the field
User to copy, one should select the user from the drop-down list to whom the permissions are to be copied, and the tabular part with teh permissions of the original user will appear; - if the tabular part contains permissions with Sign phase, select the certificate from the drop-down list in the Replacement column (it is possible to select the certificate of the original user);
- check the box for the permissions to be copied. When copying all permissions, a check mark must be placed on the table header to select all positions in the table at once. If necessary, one can pre-filter the table part, e.g. by document type, status or any other parameter;
- click on the button
Copy.
The permissions checked will be copied to the specified user.
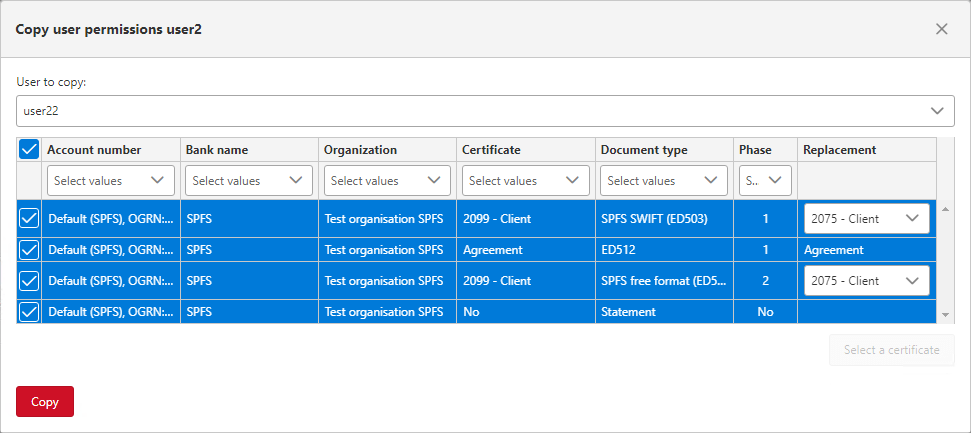
|
|---|
| Copying user permissions |
In the Copy user permissions window, it is possible to install one certificate at once to all positions for which the Sign phase type is set. To do this it is necessary to:
- in the tabular part check all records where replacement of the certificate is required (for convenience you can pre-filter records in the table by certificate and check all filtered records at once);
- click the button
Select a certificatein the bottom right corner of the form; - select the required value from the drop-down list in the Select Certificate window;
- click on the button
Select.
The selected certificate will be installed for all checked entries.
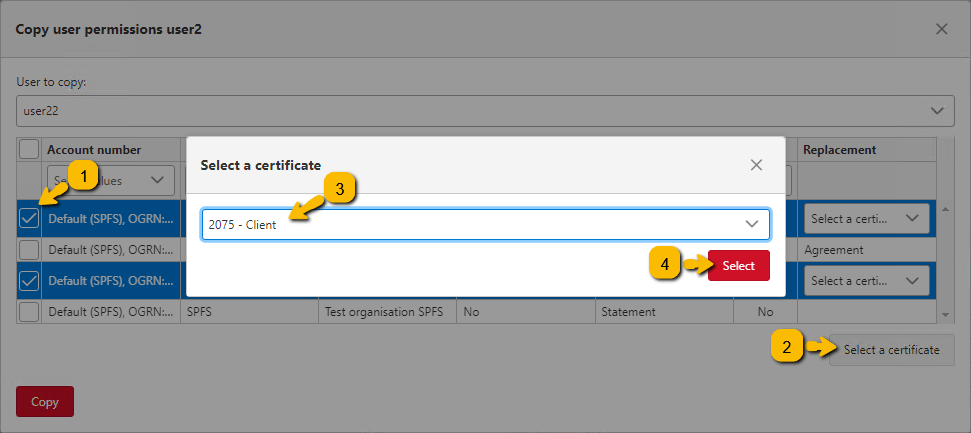
|
|---|
| Replacing certificates when copying permissions |
Setting confirming role to user
Terminal Transit allows you to enter the role of Confirming Change. In this case, actions performed by the administrator to configure the Transit Terminal (create/delete/edit organizations, accounts, signature models, permissions, etc.) will require confirmation from the user assigned to this role. This role only regulates the confirmation of changes to Transit Terminal settings, and has nothing to do with the approval of business documents.
Only one non-administrator user can be assigned to the role of Confirming Change.
In order to assign the Confirming Role to a user, double click on the user you want to assign the role to in Settings in the Users section. A modal window will open where you should press the button Assign as approver of changes:
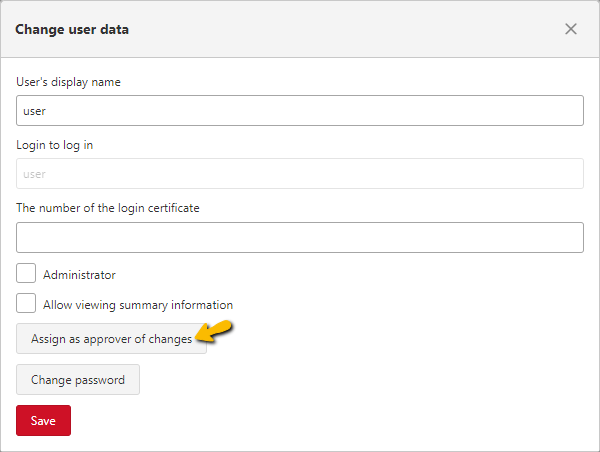
|
|---|
| Assigning the user to confirm changes |
The user will then have a Change Requests section in Settings where the user with the Confirming Rol can confirm or reject the action. To approve the action, tick the appropriate requests in the table and click on the button Approve, or click on the button Decline to reject the action.
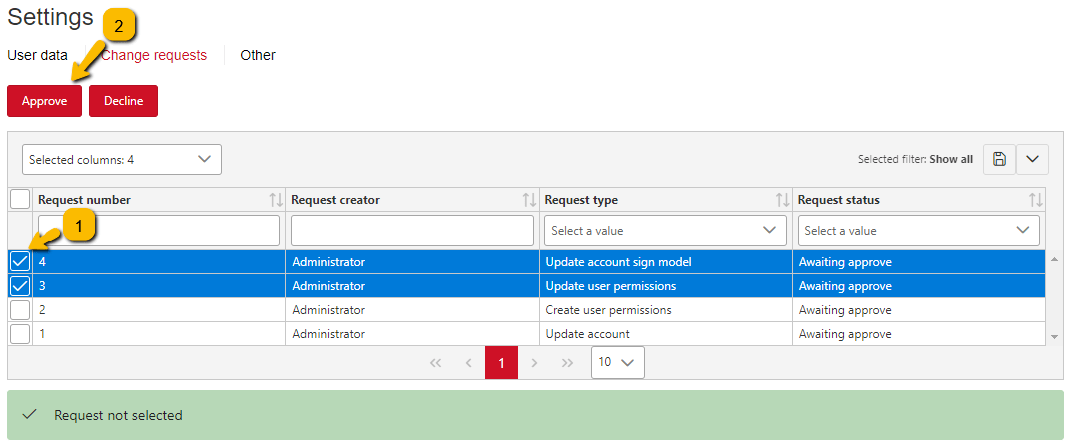
|
|---|
| Change requests |
If you left-click on a request line in the tabular area, you can see detailed information about that request:
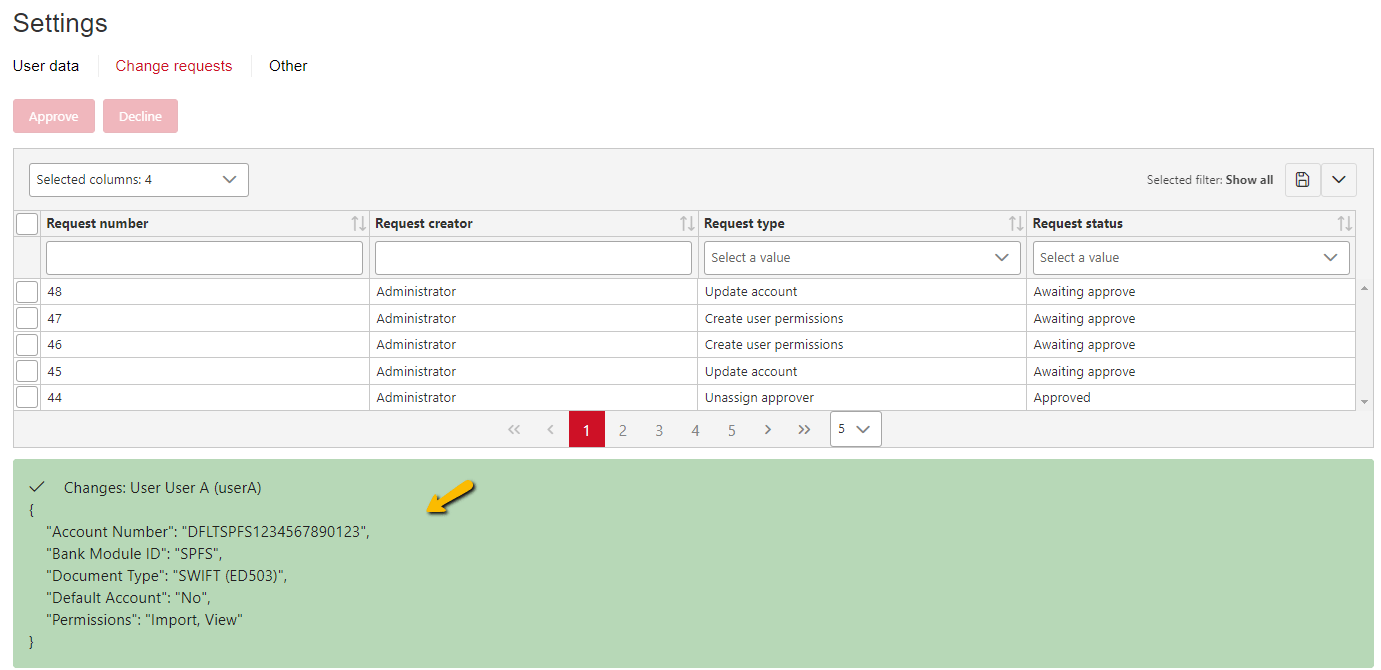
|
|---|
| Decryption of change requests |
To remove the authority of the Confirming Change, double left click on the user, and a modal window will open where the button Remove authority approver must be clicked:
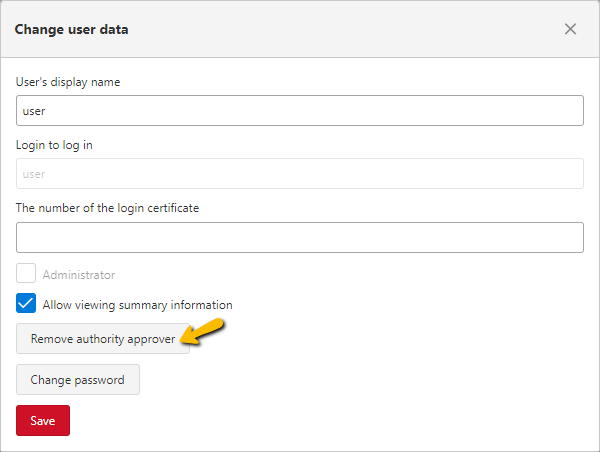
|
|---|
| Remove authority approver |
A warning will then be displayed:
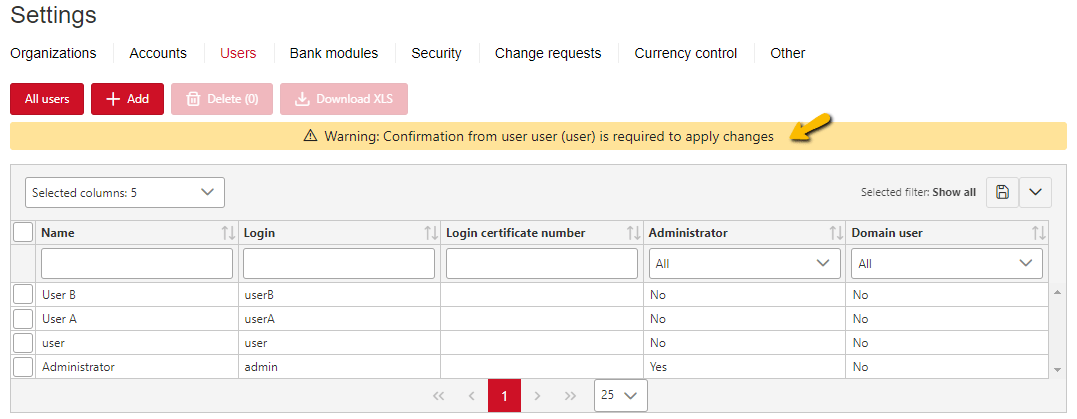
|
|---|
| Warning on removal of confirmation authority |
This warning informs you that in order to complete the operation (removal of the Confirming authority), the user who is being removed as Confirmer must approve this action in the Change Requests section.
If one want to reassign the Confirming role to another user, you must open the settings of the user as the new Confirmer in the Users section (by double-clicking on the user) in Settings. Press the button Appoint to confirm changes in the modal window. In this case a warning will be displayed (see Figure “Warning when confirmatory authority is withdrawn”). The current Confirming user must therefore approve this action in Change Requests, namely the appointment of a new Confirming user.
Please note Losing the password of a user with the Confirming Role will result in a complete reinstallation of the Transit Terminal and re-configuration. Resetting the password and transferring this role to another user without knowing the password of the current Confirming user is not possible.
Change requests
This section is available to users with administrative rights and to a user assigned the confirming role (see Setting confirming role to user for details).
Administrators (not given the confirming role) can only reject requests; confirmation of requests is not available to them. Confirmation of requests is only available to the user with the confirming role.
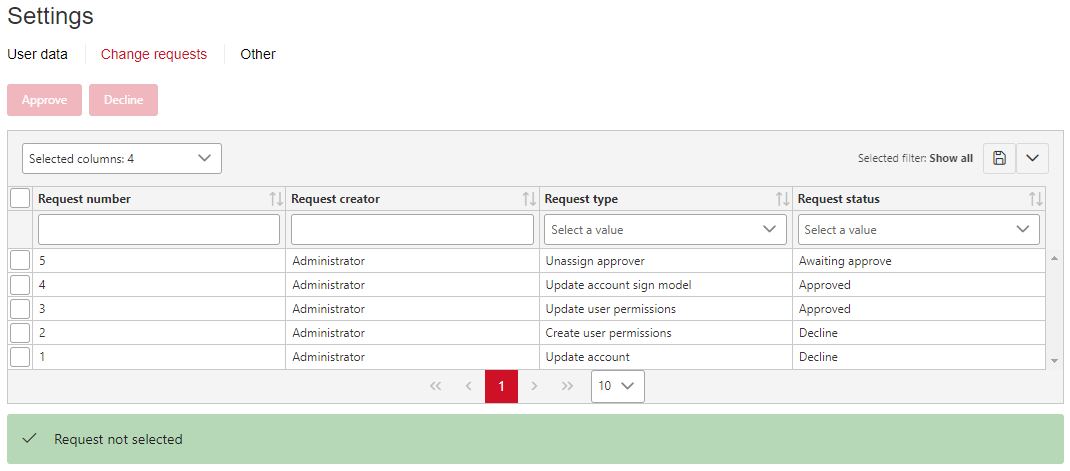
|
|---|
| Section Change requests |
Automatic import of documents
Terminal Transit provides the option to set up auto-import of documents from a specified directory at a specified interval.
In order to set up auto-import, it is necessary to enable the option Automatic import in the Other section:
- tick the checkboxes to indicate the document types which should be automatically imported into the Transit Terminal;
- for each document type you may indicate a mask (symbols in the name of imported files which will identify the document type); the mask is not obligatory for SPFS documents.
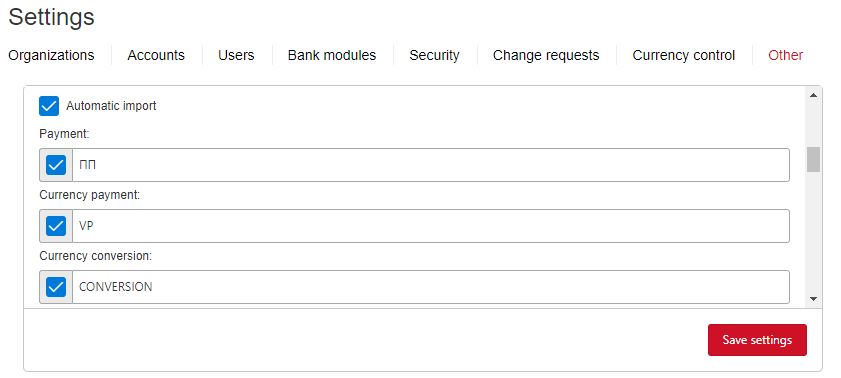
Specifying a mask for documents during auto-import
Note: in the first stage, the files to be imported are searched by mask. In the second stage, all other files that were not defined by a mask will be processed; the document type is recognized according to the file contents.
-
select one of the two values in the field
Method of marking imported documents:Symbol- this method will add an underscore character_to the beginning of the file name that was imported.Move- this method also specifies the path to the folder to move in the fieldDirectory for imported documents. In this way, the files that have been imported to the Transit Terminal will be moved to the specified folder. The folder must be located on the Transit Terminal server.
-
The field
Folder scanning periodsets the frequency of the folder check and if there are new (unimported) files in the folders, these files will be imported into the Transit Terminal. Frequency is set as HH:MM:SS (hours, minutes, seconds). For example, if it is necessary to check the folder with imported files every 10 minutes, you should specify in the field00:10:00. -
click on
Add folder, and specify path to auto-import folder on the Transit Terminal server; this is the folder where the files to be imported to the Transit Terminal are located. Please note: you can add more than one folder, if necessary (to add a new folder, each time pressAdd folder). Use the buttonDeleteto delete the unnecessary folder path.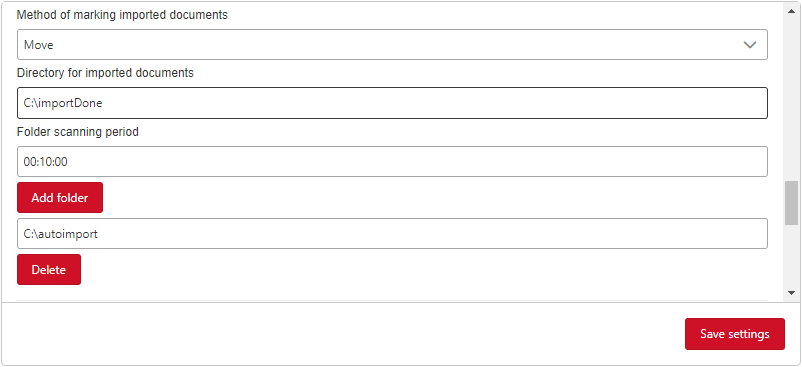
Auto import settings If no auto-import folder has been added, the user will see an error message when trying to save the settings:
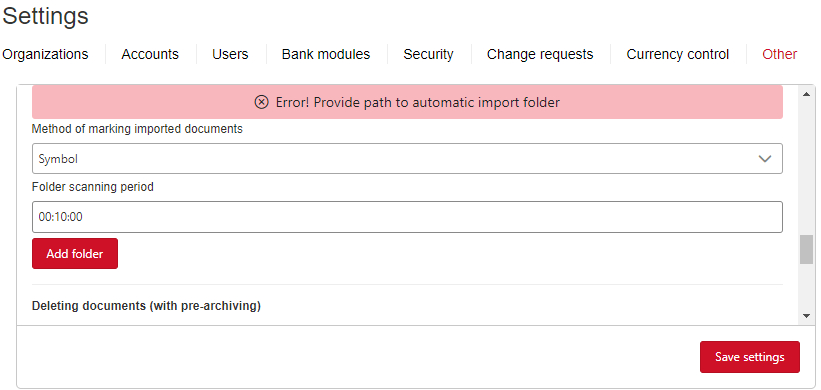
Error when saving auto-import settings
PLEASE NOTE:
- do not specify the root directory of the drive as directories (directories for imported documents or directories with files to be imported).
- The relocation folder must not be the same as the auto-import folder, nor must it be a subfolder of the auto-import folder. For example, if you specified
C:\autoimportas the automatic import folder, you must not specify the same folder as the relocation folder, or, for example,C:\autoimport\done. Specify a separate folder to relocate, e.g.C:\importDone, which will not be a sub-folder of the automatic import folder.
Please note: in case of SPFS documents, automatic import is only possible for SWIFT messages (ED503).
Deleting documents (pre-archiving)
It is possible to delete old documents from the Transit Terminal and archive them beforehand.
This option is semi-automatic.
If you need to delete old documents from Transit terminal, you should go to Other section (admin panel). In the Deleting documents (with pre-archiving) block, please specify directory on Transit Terminal server where archive with documents to be deleted will be saved (field Archive saving path), and also specify date until which documents will be deleted and archived (inclusive).
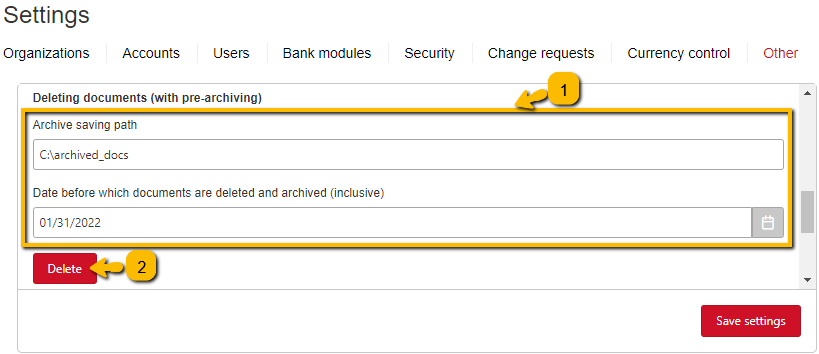
|
|---|
| Deleting documents in Transit Terminal with pre-archiving |
Thus, each time you need to delete (archive) old documents you should perform the above described operation in section Other in the administrative panel.